WooCommerce is a powerful eCommerce platform that empowers millions of online stores, from small businesses to large enterprises.
This comprehensive guide aims to walk you through every step of setting up and optimizing your own WooCommerce store.
Whether you’re a complete beginner or looking to refine your existing online store, this guide offers actionable insights and step-by-step instructions.
From installing the essential plugins to advanced features like SEO and analytics, we’ve got you covered.
Understanding the basics of WooCommerce is crucial for anyone aspiring to venture into the world of online selling.
Key Takeaways
Hide- WooCommerce Setup: The initial setup is the foundation of your online store. Make sure to choose a reliable hosting provider, secure domain name, and SSL certificate.
- Product Management: Adding and managing products effectively is vital for providing a seamless customer experience.
- Payment and Shipping: Secure and diverse payment options, along with flexible shipping configurations, can significantly impact your store's credibility and customer satisfaction.
- Customization and Extensions: Utilizing themes, plugins, and extensions allows you to tailor your WooCommerce store to meet specific business needs and customer expectations.
- SEO and Analytics: These are not optional but essential for driving organic traffic and making data-driven decisions.
In this guide, you’ll not only learn how to set up your store but also discover the best practices to make it successful.
So, if you’re ready to dive into the world of eCommerce with WooCommerce, let’s get started. This guide is designed to be your roadmap, providing you with all the tools and knowledge you need to build a thriving online store.
What is WooCommerce?
WooCommerce is an open-source eCommerce platform built on WordPress, one of the most popular content management systems in the world.
It allows you to create a fully functional online store without the need for extensive coding or web development skills.
WooCommerce is highly customizable, offering a range of themes and plugins to tailor your store to your specific needs. In essence, it’s a robust solution for anyone looking to sell products or services online.
So, what is WooCommerce used for? It’s used for a variety of online selling activities, from retailing physical goods to offering digital downloads, subscriptions, and even appointments.
With its user-friendly interface and extensive features, WooCommerce makes it easier than ever to set up and manage an online store.
Whether you’re a small business owner or an eCommerce giant, WooCommerce provides the tools you need to succeed in the digital marketplace.
Also read: WooCommerce vs Shopify
In this WooCommerce tutorial, we aim to guide you through the entire process of setting up your WooCommerce website.
From the initial WooCommerce setup to adding products and optimizing for search engines, we’ve got you covered. So, if you’re wondering how to use WooCommerce effectively, you’re in the right place.
Why Choose WooCommerce for Your Online Store?
Selecting the right platform for your online business is a critical decision that can significantly impact your success. WooCommerce stands out as a top choice for several compelling reasons.
First and foremost, its open-source nature offers unparalleled customization options unlike Shopify which applies paid subscription method. You can tailor every aspect of your WooCommerce store to meet your specific requirements.
Also read: Shopify Tutorial – How to Create an Online Store with Shopify
Another advantage lies in its seamless integration with WordPress. If you’re already familiar with WordPress, navigating the WooCommerce setup becomes a straightforward process.
This integration also allows you to take advantage of WordPress’s robust SEO features, giving your online store a competitive edge in search rankings.
Cost-effectiveness is another strong suit of WooCommerce. Unlike other eCommerce platforms that charge monthly fees, WooCommerce is free to use.
You’ll only need to invest in web hosting and any premium plugins or themes you choose to add. This makes it an ideal solution for businesses on a budget.
Security is a paramount concern in the eCommerce industry, and WooCommerce doesn’t disappoint in this regard.
Regular updates and a large community of developers ensure that your WooCommerce website remains secure against various online threats.
WooCommerce offers a blend of customization, ease of use, cost-effectiveness, and security. These features make it an excellent choice for anyone looking to venture into the eCommerce space.
As we delve deeper into this WooCommerce tutorial, you’ll learn how to set up WooCommerce to maximize these benefits for your online store.
What You’ll Learn in This WooCommerce Tutorial
Navigating the world of eCommerce can be a daunting task, especially for those who are new to the industry. This comprehensive WooCommerce tutorial aims to simplify that journey for you.
We’ll cover everything from the initial WooCommerce setup to advanced features that can help scale your business.
You’ll start by understanding the prerequisites for setting up a WooCommerce website.
This includes choosing a domain name, selecting a web hosting service, and installing an SSL certificate for secure transactions.
These foundational steps are crucial for the smooth operation of your online store.
Next, we’ll guide you through the process of installing WordPress and the WooCommerce plugin.
You’ll learn how to use WooCommerce to add products, set up payment gateways, and configure shipping options. Each step will be explained in detail to ensure you can follow along easily.
But we won’t stop at the basics. This guide also delves into more advanced topics such as customizing your WooCommerce store’s appearance, optimizing for SEO, and leveraging various plugins to enhance functionality.
By the end of this tutorial, you’ll have a well-rounded understanding of how to use WooCommerce to its fullest potential.
So, if you’re eager to create a successful WooCommerce store, this guide is your one-stop resource. Let’s dive in and start building your dream online business.
Getting Started with WooCommerce
Before you can start building your WooCommerce store, there are some preliminary steps you need to take.
These initial requirements are crucial for ensuring that your online store has a strong foundation.
In this section, we’ll discuss what you need to get started, from domain names to web hosting and SSL certificates.
Requirements for Setting Up WooCommerce
Before diving into the WooCommerce setup, it’s essential to ensure you have all the prerequisites in place.
These foundational elements are the building blocks of your WooCommerce website, and skipping any of them could lead to complications down the line.
Domain Name
Your domain name serves as your online address, making it easier for customers to find your WooCommerce store.
Choose a name that is easy to remember, relevant to your business, and preferably includes keywords related to your industry.
You can choose the top domain registrars such as NameCheap, Godaddy or Porkbun to register your domain name.
Web Hosting
A reliable web hosting service is crucial for the performance and uptime of your online store. Several hosting providers offer specialized plans optimized for WooCommerce, ensuring that your site runs smoothly even during high traffic periods.
Some recommended hosting providers to host WordPress and WooCommerce are:
- Digitaocean VPS
- Kinsta
- Cloudways
- Hostinger Cloud Hosting
- SiteGround
- InMotion Hosting
- and many more…
SSL Certificate
An SSL certificate encrypts the data transferred between your WooCommerce website and your customers. This is a non-negotiable requirement for any online store, as it ensures secure transactions and builds trust with your audience.
Let’s Encrypt SSL and Cloudflare Flexible SSL are the best among free options. But as your online store grows bigger, dedicated and more secure SSL certificate such as Comodo SSL Certificate and SSLs.com are needed.
Installing WordPress
Once you’ve secured a domain name, chosen a web hosting service, and installed an SSL certificate, the next step is to install WordPress.
This is the platform on which your WooCommerce store will be built. WordPress is known for its user-friendly interface and extensive customization options, making it an ideal choice for eCommerce.
Installing WordPress is usually a straightforward process, especially if your hosting provider offers a one-click installation feature.
Follow the on-screen instructions, and within minutes, you’ll have a WordPress website ready for the next stages of your WooCommerce setup.
We will not cover how to install WordPress in this article, but you can find the complete guide on how to installing WordPress.
Installing WooCommerce Plugin

After successfully installing WordPress, you can proceed to install the WooCommerce plugin. This is the software that will transform your WordPress website into a fully functional online store.
Navigate to the WordPress dashboard, go to ‘Plugins,’ and search for WooCommerce.
Click ‘Install‘ and then ‘Activate,’ and you’ll be ready to start adding products and configuring your store.
Basic WooCommerce Setup
After ensuring that all prerequisites are in place, the next step in our WooCommerce tutorial is to walk you through the basic WooCommerce setup.
This involves using the WooCommerce Setup Wizard and customizing your store’s appearance.
Both are crucial steps in creating a WooCommerce website that not only functions well but also looks appealing to your target audience.
WooCommerce Setup Wizard
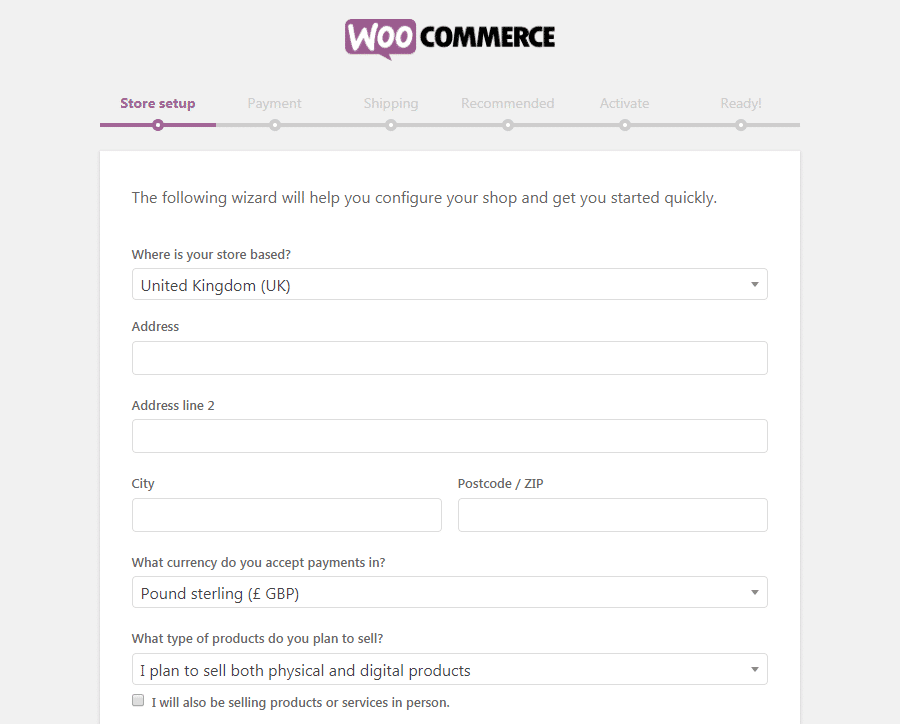
Once you’ve activated the WooCommerce plugin, you’ll be prompted to complete the WooCommerce Setup Wizard. This is a guided tour that helps you configure the essential settings for your online store.
Store Location
The first prompt will ask you to specify your store’s location. This information is vital for tax and shipping calculations. Make sure to enter accurate details to avoid any issues later on.
Industry and Product Type
Next, you’ll be asked about the industry you’re in and the types of products you plan to sell. This helps WooCommerce recommend the best settings and extensions for your specific needs.
Basic Store Customization
After completing the setup wizard, your WooCommerce store will be functional but not yet customized. The next step is to make it visually appealing and aligned with your brand.
Storefront Design
WooCommerce offers a variety of themes designed specifically for eCommerce. You can choose one that fits your brand’s aesthetic and customize it further to meet your needs.
Adding Logo and Branding
Your logo and branding elements can be added through the WordPress Customizer. Navigate to ‘Appearance’ > ‘Customize’ in your WordPress dashboard to upload your logo and set your brand’s color scheme.
By following these steps, you’ll have a basic but functional WooCommerce website ready for the next stages of development.
In the upcoming sections, we’ll delve into how to add products, set up payment gateways, and much more. Stay tuned as we guide you through the comprehensive process of setting up your WooCommerce store.
Adding and Managing New Products in WooCommerce
Now that your basic WooCommerce setup is complete, the next crucial step in building your WooCommerce website is adding products.
This is where you’ll start populating your online store with items that your customers can purchase. In this section, we’ll explore the different types of products you can add and how to go about it.
Types of Products in WooCommerce
WooCommerce allows you to sell a wide range of products, catering to various business models. Understanding the types of products you can sell will help you make the most of your WooCommerce store.
Simple Products
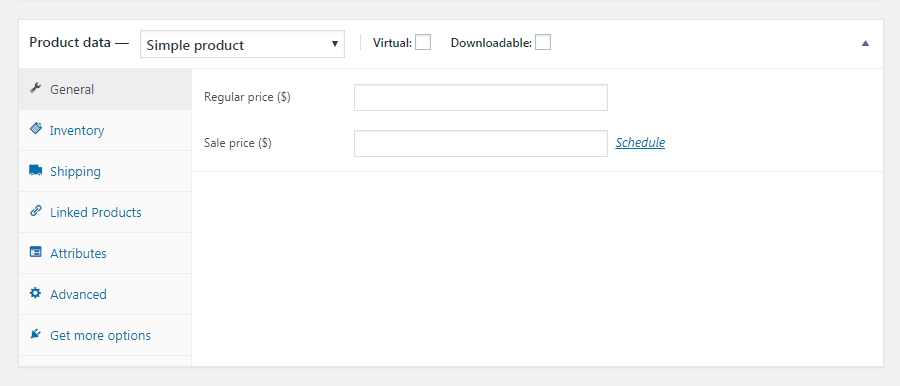
These are straightforward, single-item products that don’t require any variations. If you’re selling a book or a piece of furniture, for example, it would typically be categorized as a simple product.
Variable Products
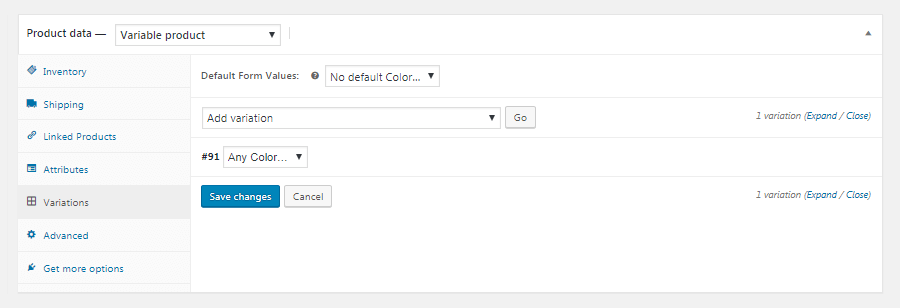
Variable products are more complex and offer different variations like size, color, or other custom attributes. For instance, a t-shirt that comes in multiple sizes and colors would be a variable product.
Digital Products
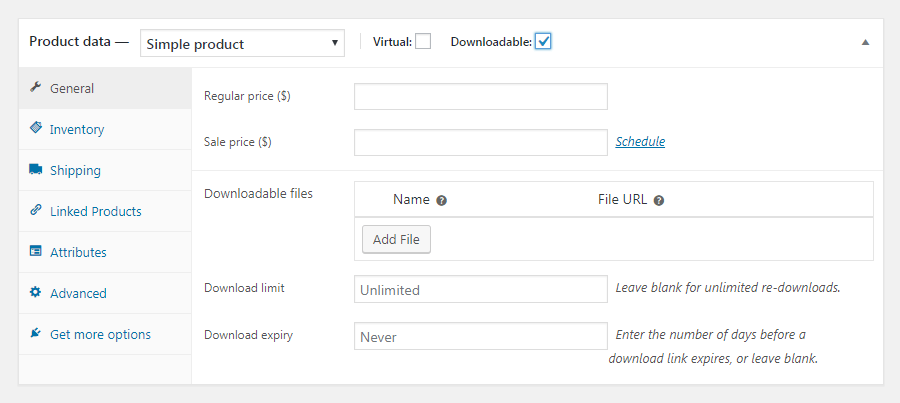
WooCommerce also supports the sale of digital goods or digital products like eBooks, software, or digital courses. These products don’t require shipping, making the transaction process slightly different.
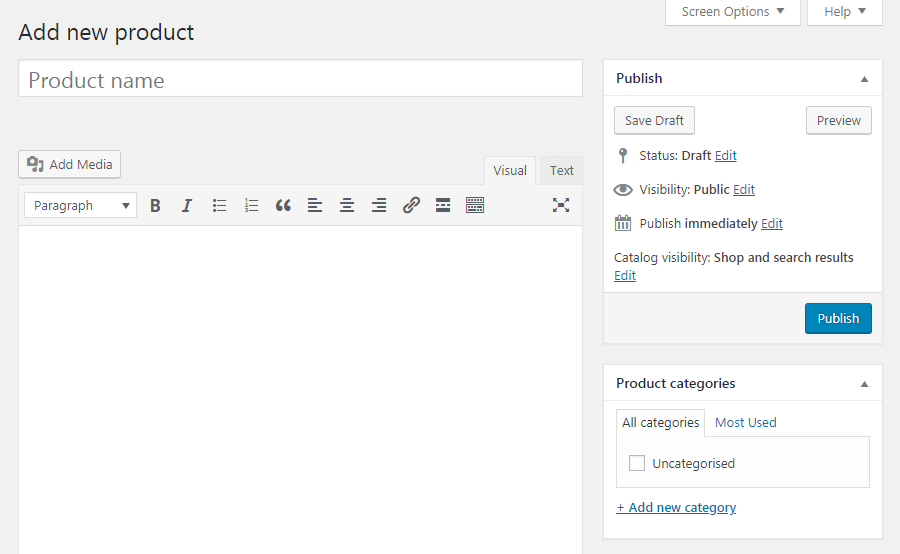
How to Add a New Product
Adding a new product to your WooCommerce store is a straightforward process, but it’s crucial to get it right for a seamless customer experience.
- Navigate to your WordPress dashboard and go to ‘Products‘ > ‘Add New.’
- Fill in the product name, description, and other relevant details.
- Set the product type (Simple, Variable, or Digital) and price.
- Add product images and any additional information like SKU, stock status, and shipping details.
Organizing your products into categories and tags can significantly improve the user experience on your WooCommerce website.
Categories are like the main aisles in a grocery store, while tags serve as the descriptors that help customers find exactly what they’re looking for.
To add categories and tags, go to ‘Products‘ > ‘Categories‘ or ‘Tags‘ in your WordPress dashboard. You can then assign these to products as you add them to your store.
By following these steps, you’ll have a well-organized product catalog, making it easier for customers to browse and make purchases. In the next sections of this WooCommerce tutorial, we’ll discuss setting up payment gateways and configuring shipping options to further optimize your WooCommerce store.
Setting Up Payment Gateways in WooCommerce
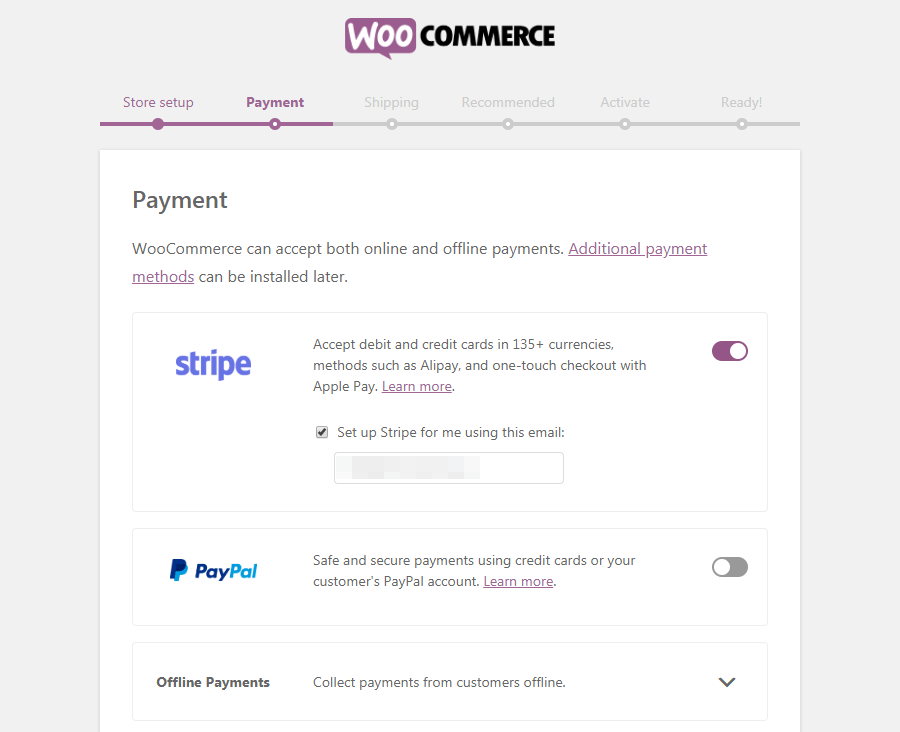
Having a reliable and secure payment gateway is crucial for the success of your WooCommerce store.
This is the system that will handle transactions between you and your customers, ensuring that payments are processed smoothly and securely.
In this section, we’ll guide you through the process of setting up payment options for your WooCommerce website.
Overview of Payment Options
WooCommerce supports a variety of payment gateways, giving you the flexibility to choose the one that best suits your business needs.
From traditional options like PayPal and Stripe to more localized solutions, you have a wide range of choices.
Setting Up PayPal and Stripe
PayPal and Stripe are among the most popular payment gateways, known for their reliability and ease of use. Here’s how to set them up:
- Navigate to your WordPress dashboard and go to ‘WooCommerce‘ > ‘Settings‘ > ‘Payments.’
- You’ll see a list of available payment methods. Click ‘Set up‘ next to PayPal or Stripe.
- Follow the on-screen instructions to configure the payment gateway. You’ll need to enter your PayPal or Stripe account details and set your preferred payment options.
Other Payment Methods
While PayPal and Stripe are widely used, you may also consider other payment gateways that are more suited to your specific needs or geographic location.
To add a new payment method, go to ‘WooCommerce‘ > ‘Settings‘ > ‘Payments‘ and click ‘Add Payment Method.’ Follow the prompts to complete the setup.
By configuring reliable payment gateways, you ensure that your customers have a smooth and secure checkout experience.
This is a critical aspect of how to use WooCommerce effectively, as it directly impacts your store’s credibility and customer trust.
Also read: Best WooCommerce Payment Gateways
In the upcoming sections of this WooCommerce tutorial, we’ll delve into shipping and tax configurations to further optimize your WooCommerce store for success. Stay tuned for more actionable insights.
Setup Shipping and Taxes
After setting up your payment gateways, the next step in optimizing your WooCommerce store involves configuring your shipping and tax settings.
These are vital components of your online business, affecting both your profit margins and your customers’ satisfaction.
In this section, we’ll walk you through the process of setting up shipping zones, methods, and tax configurations for your WooCommerce website.
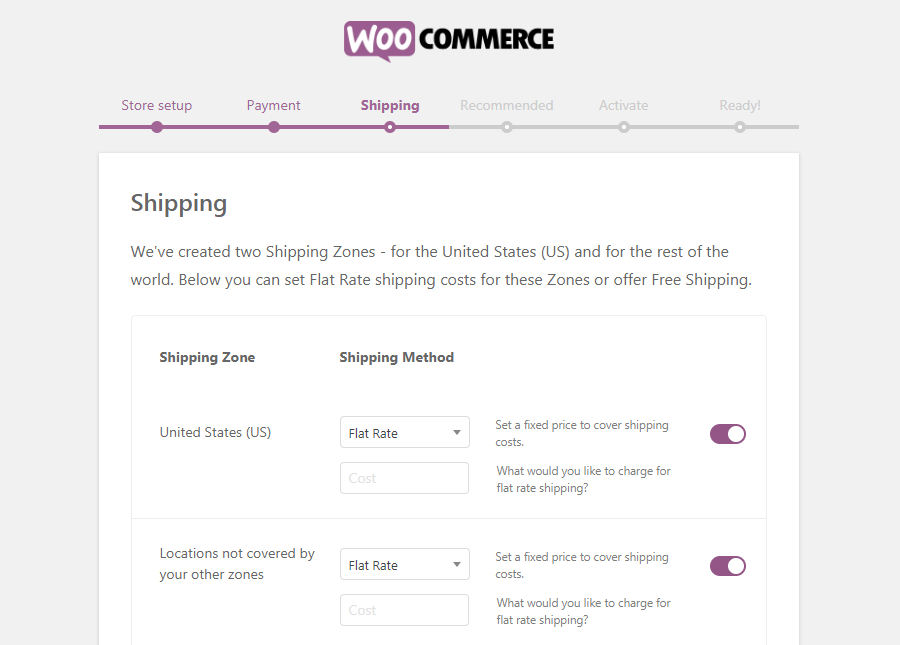
Setting Up Shipping Zones
Shipping zones are geographical areas where you offer shipping services. Defining these zones allows you to set specific shipping rates and methods based on the customer’s location.
- Go to your WordPress dashboard and navigate to ‘WooCommerce‘ > ‘Settings‘ > ‘Shipping.’
- Click ‘Add shipping zone‘ and enter the zone name and regions it covers.
- After defining the zone, you can add shipping methods like flat rate, free shipping, or local pickup.
Adding Shipping Methods
Within each shipping zone, you can offer multiple shipping methods. This gives your customers the flexibility to choose the option that best suits their needs.
- In the ‘Shipping Zones‘ settings, click on the zone where you want to add a method.
- Click ‘Add shipping method‘ and select the method you wish to offer, such as flat rate or free shipping.
- Configure the settings for the chosen method, including the shipping cost if applicable.
Configuring Tax Settings
Tax settings are another crucial aspect of your WooCommerce setup.
Properly configured tax settings ensure that you’re compliant with local and international tax laws.
- Navigate to ‘WooCommerce‘ > ‘Settings‘ > ‘Tax‘ in your WordPress dashboard.
- Choose your preferred tax options, such as whether prices entered will include tax or not.
- You can also set standard, reduced, or zero tax rates based on the shipping zones you’ve defined.
By carefully configuring your shipping and tax settings, you enhance the customer experience by offering transparent pricing and shipping options.
This is an essential part of running a successful WooCommerce store and is covered in detail in this WooCommerce tutorial.
In the following sections, we’ll explore how to further customize and optimize your WooCommerce website. Stay tuned as we guide you through the advanced features that will make your online store stand out.
Start Customizing Your WooCommerce Online Store

Once the foundational elements like products, payment gateways, shipping, and taxes are set up, the next step is to focus on the aesthetics and functionality of your WooCommerce store.
Customization is key to differentiating your online store from competitors and providing a unique shopping experience for your customers.
In this section, we’ll discuss how to choose a WooCommerce-compatible theme and how to customize your storefront.
Choosing a WooCommerce-Compatible Theme
The theme you choose sets the visual tone for your WooCommerce website. It’s crucial to select a theme that is not only visually appealing but also optimized for WooCommerce.
- Navigate to ‘Appearance‘ > ‘Themes‘ in your WordPress dashboard.
- Click ‘Add New‘ and use the search bar to find themes that are WooCommerce-compatible.
- Preview and install the theme that aligns with your brand’s aesthetic.
There are a lot of free WooCommerce themes available in WordPress themes repository. You can also customize the look and feel of your online store using page builder plugins such as Elementor and Divi builder.
If you have the budget, you can even browse high quality and premium themes on marketplaces such as Themeforest.
Customizing the Storefront
After installing your chosen theme, the next step is to customize it to fit your brand’s identity. This involves tweaking various elements like colors, fonts, and layouts.
Using Page Builders for Customization
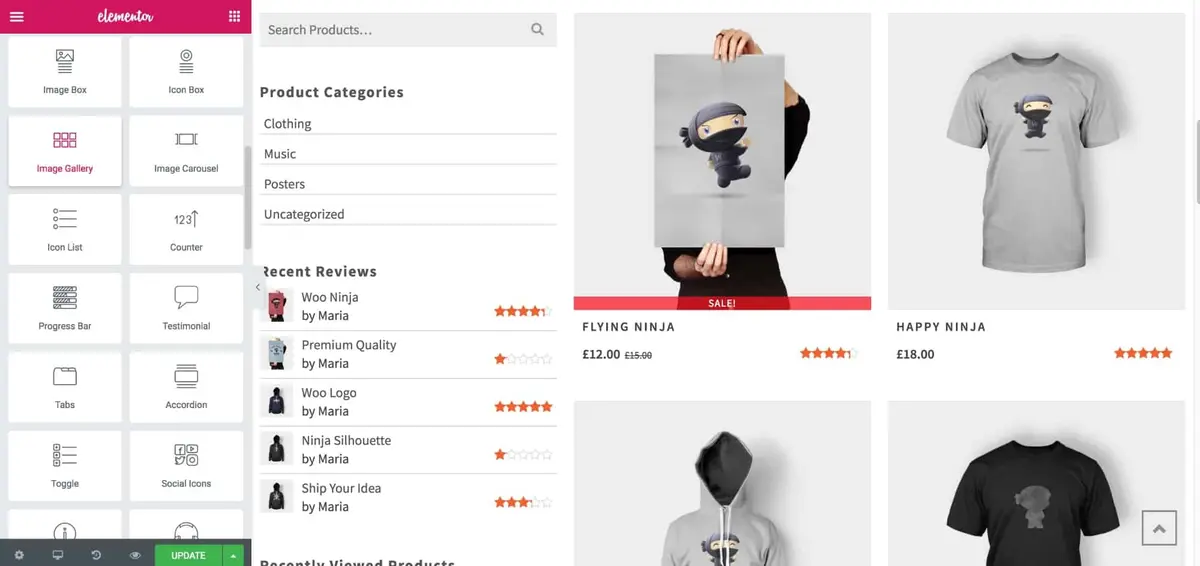
Page builders like Elementor (or the Elementor Pro version) or Beaver Builder offer a drag-and-drop interface to customize your WooCommerce store easily. These tools provide a range of widgets and modules specifically designed for eCommerce websites.
- Install your preferred page builder from the ‘Plugins‘ section in your WordPress dashboard.
- Navigate to the page you want to customize and launch the page builder.
- Use the drag-and-drop interface to add or modify elements on your page.
By investing time in customizing your WooCommerce store, you not only enhance its visual appeal but also improve its functionality.
This is a crucial step in how to set up WooCommerce for success, as a well-designed website can significantly impact customer engagement and conversion rates.
In the upcoming sections of this WooCommerce tutorial, we’ll delve into extensions and plugins that can add advanced features to your online store. Stay tuned for more tips on optimizing your WooCommerce website for success.
WooCommerce Extensions and Plugins
As you continue to build and grow your WooCommerce store, you’ll find that the platform’s basic features may not cover all your business needs.
This is where WooCommerce extensions and plugins come into play. These additional tools can significantly enhance your store’s functionality, from SEO optimization to email marketing.
In this section, we’ll discuss some must-have WooCommerce plugins and other extensions that can elevate your online business.
Must-Have WooCommerce Plugins
There are several plugins that are almost universally beneficial for any WooCommerce website. These plugins can help with everything from SEO to improving your store’s checkout process.
- OneClick Chat to Order: This plugin helps you connect your WooCommerce-powered store with WhatsApp, enabling your customers to proceed their orders directly via WhatsApp. The most interesting thing is, it’s free and contains a lot of features.
- WooCommerce Subscriptions: If you offer subscription-based products, this plugin is a must-have.
- WooCommerce PDF Invoices & Packing Slips: This plugin automates the invoicing process, saving you time and effort.
- WooCommerce Multilingual: A really great plugin if you want your store to serve international market.
- YITH WooCommerce Wishlist: Similar to the “Favorites” list found on many major ecommerce sites, such as Amazon. It’s not for every brand, but giving your customers the option to store specific things for later makes sense in many cases.
- Custom Product Tabs for WooCommerce: A plugin that consolidates tabs on your product pages. This allows you to label tabs with information such as descriptions, specifications, reviews, and more.
- WooCommerce Customizer: Expands the number of adjustable settings in WooCommerce.
- And many more…
To install a plugin, go to ‘Plugins‘ > ‘Add New‘ in your WordPress dashboard, search for the plugin, and click ‘Install Now’ followed by ‘Activate’.
SEO Plugins for WooCommerce
Search engine optimization (SEO) is crucial for the visibility and success of your online store. While WooCommerce itself is SEO-friendly, additional plugins can give you an edge over competitors.
- Yoast SEO for WooCommerce: This plugin helps optimize your product pages for search engines, an essential aspect of running a successful online store.
- Rank Math SEO: Another excellent option for SEO, this plugin offers features like XML sitemaps and Google Analytics integration.
- SEOPress: A lightweight, freemium WordPress SEO plugin that comes with a nice set of features.
Email Marketing Plugins
Email marketing is a powerful tool for customer retention and engagement. Several plugins can integrate seamlessly with WooCommerce to automate and optimize your email marketing campaigns.
- Mailchimp for WooCommerce: This plugin integrates your WooCommerce store with Mailchimp, allowing you to send targeted email campaigns.
- WooCommerce Email Customizer: Customize your transactional emails to align them with your brand’s identity.
You can also find premium plugins which greatly extend the functionalities of your WooCommerce store on marketplaces like CodeCanyon.
By leveraging these plugins and extensions, you can add advanced features that enhance both the customer experience and your store’s performance.
Explore and Setup WooCommerce’s Advanced Features
As your WooCommerce store grows, you may find the need to implement more advanced features to meet the demands of your expanding customer base.
These features can range from offering coupons and discounts to setting up affiliate programs and subscription services.
In this section of our WooCommerce tutorial, we’ll guide you through some of these advanced functionalities that can add value to your online store.
Creating Coupons and Discounts
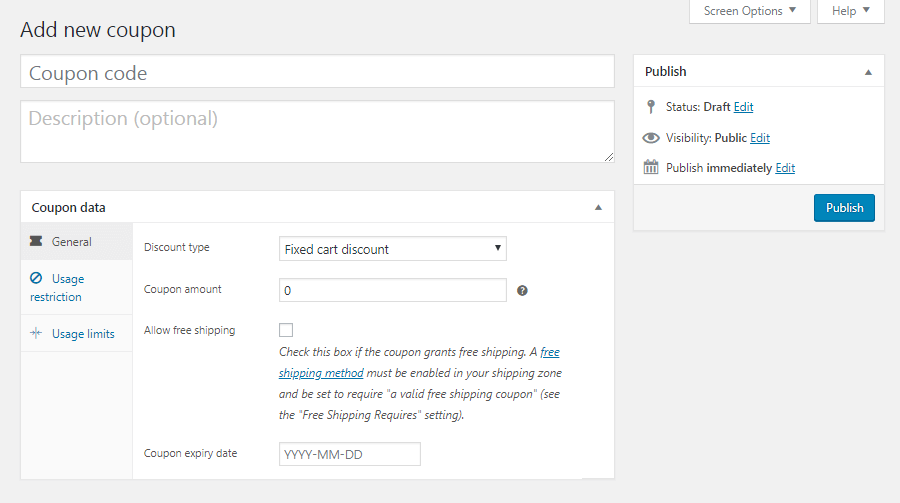
Offering coupons and discounts can be an effective way to attract new customers and retain existing ones. WooCommerce has built-in features that make it easy to set up various types of promotions.
- Navigate to ‘WooCommerce‘ > ‘Coupons‘ in your WordPress dashboard.
- Click ‘Add Coupon‘ and fill in the necessary details such as coupon code, discount type, and expiration date.
- Publish the coupon, and it will be ready for use in your online store.
Setting Up Affiliate Programs
Affiliate programs can be a great way to drive traffic and sales to your WooCommerce store. While WooCommerce doesn’t offer this feature out of the box, several plugins can help you set up a robust affiliate program.
- Install an affiliate plugin like ‘AffiliateWP‘ or ‘WooCommerce Affiliates‘ from the ‘Plugins‘ section.
- Configure the plugin settings to match your affiliate program’s terms and conditions.
- Start recruiting affiliates to promote your products and earn commissions.
Subscription and Membership Options
If your business model involves recurring payments or restricted content, you might consider adding subscription and membership options to your WooCommerce store.
- Install a subscription plugin like ‘WooCommerce Subscriptions.’
- Configure the subscription settings, including billing cycles and subscription types.
- Create subscription-based products and start offering them to your customers.
Implementing these advanced features can significantly enhance your WooCommerce store’s functionality and customer experience. They allow you to offer more than just products, turning your online store into a versatile business platform.
In the next sections of this WooCommerce tutorial, we’ll focus on SEO and analytics, crucial aspects that can influence your store’s visibility and performance.
WooCommerce SEO and Analytics
In the digital age, having a well-designed and functional WooCommerce store is only half the battle.
The other half involves making your store easily discoverable by potential customers and analyzing user behavior to make data-driven decisions.
In this section, we’ll delve into the importance of SEO for your WooCommerce website and how to set up Google Analytics for tracking your store’s performance.
Importance of SEO for eCommerce
Search Engine Optimization (SEO) is not just a buzzword; it’s a necessity for any online business.
A well-optimized WooCommerce store is more likely to appear in search engine results, attracting more organic traffic and, consequently, more sales.
Basic SEO Tips for WooCommerce
- Keyword Research: Identify the keywords relevant to your products and include them in your product titles, descriptions, and meta descriptions.
- Quality Content: Create valuable content that addresses the needs and questions of your target audience. This could be in the form of blog posts, how-to guides, or product reviews.
- Site Speed: Slow-loading websites can harm your search engine rankings. Optimize images, use caching, and consider using a Content Delivery Network (CDN) to improve your site’s speed.
Setting Up Google Analytics
Understanding your customers’ behavior is crucial for the growth and optimization of your WooCommerce store. Google Analytics provides valuable insights into how users interact with your website.
- Sign up for a Google Analytics account if you don’t already have one.
- Add your WooCommerce website as a property in your Analytics account.
- Install a Google Analytics plugin for WordPress, or manually insert the tracking code into your website’s header.
By integrating Google Analytics with your WooCommerce store, you can track metrics like visitor demographics, pageviews, and conversion rates. This data is invaluable for making informed decisions to improve your store’s performance.
Additional Resources and Next Steps
Congratulations on making it this far in our comprehensive WooCommerce tutorial! By now, you should have a well-rounded understanding of how to set up and optimize a WooCommerce store.
However, the eCommerce landscape is ever-changing, and there’s always more to learn.
In this concluding section, we’ll point you toward additional resources and suggest next steps to keep your WooCommerce website evolving and successful.
WooCommerce Community and Support
One of the greatest strengths of WooCommerce is its vibrant community of developers, store owners, and eCommerce experts.
Engaging with this community can provide you with valuable insights and solutions to challenges you may encounter.
- WooCommerce Community: This is a great place to ask questions and share your own experiences.
- WooCommerce Blog: Regularly updated with tips, tricks, and industry news to keep you informed.
Ongoing Optimization
Your WooCommerce store is not a set-it-and-forget-it project; it requires ongoing optimization to meet the needs of your customers and stay ahead of competitors.
- A/B Testing: Use tools like Google Optimize to run A/B tests on your product pages, checkout process, and other key areas.
- Customer Feedback: Regularly solicit feedback from your customers to understand what you’re doing right and where you can improve.
Scaling Your WooCommerce Store
As your business grows, you may need to scale your WooCommerce website to handle increased traffic and sales.
- Performance Optimization: Use caching plugins and consider upgrading your hosting plan.
- Multi-channel Selling: Expand your reach by selling on other platforms like Amazon or eBay, in addition to your WooCommerce store.
By taking advantage of these additional resources and continuously optimizing your store, you set the stage for long-term success in the competitive world of eCommerce.
We hope this WooCommerce tutorial has been a valuable resource in your journey to create a successful online store. Thank you for following along, and we wish you all the best in your eCommerce endeavors.
How to Set Up WooCommerce: Conclusion and Final Thoughts
You’ve reached the end of this comprehensive WooCommerce tutorial, and we commend you for taking the time to invest in your eCommerce education.
Building a successful WooCommerce store is a multi-faceted endeavor that involves more than just setting up a website and adding products.
From payment gateways and shipping configurations to SEO and analytics, each aspect plays a crucial role in your store’s success.
Future Updates and Learning
The world of eCommerce is ever-evolving, and staying updated with the latest trends and technologies is essential for long-term success. Subscribe to WooCommerce and eCommerce-related blogs, forums, and newsletters to keep yourself informed.
Your Next Steps
Now that you’ve gained a thorough understanding of how to set up and operate a WooCommerce store, the next step is implementation.
Apply what you’ve learned, test different strategies, and don’t hesitate to return to this guide or seek additional resources as you encounter new challenges.
Additional Tips and Best Practices to Sell with WooCommerce
As a final note in this exhaustive WooCommerce tutorial, we’d like to share some additional tips and best practices that can give you an edge in the competitive eCommerce landscape.
These nuggets of wisdom are gleaned from industry experts and successful WooCommerce store owners, aimed to help you avoid common pitfalls and maximize your store’s potential.
Mobile Responsiveness
In today’s digital age, a significant portion of online shopping happens on mobile devices. Ensure that your WooCommerce website is mobile-responsive to offer a seamless shopping experience across all platforms.
Regular Updates and Maintenance
Keeping your WooCommerce store, along with its themes and plugins, up-to-date is crucial for security and performance. Regular maintenance also includes checking for broken links, outdated content, and ensuring that all functionalities are running smoothly.
Customer Reviews and Testimonials
Encourage satisfied customers to leave reviews and testimonials. Positive reviews can significantly boost your store’s credibility and help new customers make informed decisions.
Abandoned Cart Recovery
Implement an abandoned cart recovery strategy to capture potential sales that are lost when visitors leave your site without completing a purchase. Various plugins can help automate this process.
Data Backups
Regularly back up your WooCommerce store’s data to safeguard against unexpected events like server failures or security breaches. Several plugins offer automated backup solutions.
Security Measures
Apart from having an SSL certificate, consider additional security measures like two-factor authentication and regular security audits to protect your WooCommerce store from threats.
By adhering to these additional tips and best practices, you’re not just setting up a WooCommerce store; you’re setting it up for success. These strategies can make a significant difference in how your store performs and how it’s perceived by your customers.
We’ve covered a lot of ground in this WooCommerce tutorial, and we hope it serves as a comprehensive guide for your eCommerce journey.
We hope this tutorial has equipped you with the knowledge and confidence to build a thriving WooCommerce website.
Thank you for choosing this guide as your learning resource. Good luck, and may your eCommerce journey be a prosperous one!