Shopify Tutorial: Detailed Guide on How to Use Shopify – Shopify is a well-known eCommerce platform that allows anyone to develop and launch an online business.
Shopify has been a popular choice for entrepreneurs, small company owners, and big companies alike due to its user-friendly interface and numerous functionality.
However, without a clear Shopify tutorial, it may be overwhelming for newcomers.
To help you on your way to a successful business, we’ll lead you through a step-by-step guidance on how to utilize Shopify in this Shopify tutorial.
At first, learning how to use Shopify can be overwhelming.
Ultimately, Shopify is a robust ecommerce platform that enables you to expand your business in innumerable ways, with an abundance of flexibility and control.
Key Takeaways
ShowWhat is a Shopify Store and How does it Work?
If you’re venturing into the world of online retail, you’ve likely heard of Shopify. But what is a Shopify store, and why is it such a pivotal tool for eCommerce success?
Shopify is a comprehensive platform that allows you to create an online store, manage products, and handle everything from marketing to shipping.
Shopify is a very good choice to start an online business.
It’s not just a website builder; it’s a robust solution designed to facilitate all aspects of how to set up an online store.
Previously, we have covered a comprehensive introduction article about what is Shopify and how does it work which you can read first if you haven’t.
Understanding how to use Shopify effectively can be a game-changer for your business.
Shopify offers a variety of tools to help you build a Shopify store that stands out, whether you’re starting a new business or looking to expand an existing one.
From its user-friendly interface to its extensive customization options, Shopify simplifies the process of setting up a Shopify store.
In this Shopify guide, we aim to provide a step-by-step Shopify tutorial that covers everything from the basics to advanced features.
Our goal is to equip you with the knowledge and tools you need for setting up a Shopify store successfully.
So, if you’re wondering how to start a Shopify store or how to make a Shopify website that truly sells, you’re in the right place. Let’s dive in.
Setting Up Your Shopify Store – Shopify tutorial: Step-by-step to create an online store
Setting up a Shopify store is the first crucial step in your journey to online retail success. But how does Shopify work, and what do you need to know to set up shopify store effectively?
In essence, Shopify is a cloud-based, SaaS (Software as a Service) shopping cart solution. It offers you a range of customizable templates to help you create a Shopify store that aligns with your brand’s aesthetic and functional needs.
Shopify’s user-friendly interface makes setting up a store quick and easy, regardless of whether you’re a seasoned retailer or just getting started.
In this section of our Shopify tutorial, we’ll walk you through the essential steps of how to set up a Shopify store. From choosing the right plan to customizing your store’s theme, we’ve got you covered.
Our Shopify guide aims to simplify the process, making it easier for you to build a Shopify store that not only looks good but also performs well.
So, if you’re wondering how to create a Shopify store or how to make a Shopify store that truly stands out, keep reading.
How to Set Up a Shopify Store: Your Step-by-Step Guide
Setting up a Shopify store involves several key steps, each crucial for ensuring your online retail venture’s success. Here’s a step-by-step guide to help you navigate the Shopify store setup process.
- Choose Your Plan: Shopify offers various plans to suit different business needs. Whether you’re setting up a small boutique or a large online retail outlet, there’s a plan for you.
- Create an Account: To start a Shopify store, you’ll need to create an account. This involves providing some basic information and setting up your admin panel.
- Select a Theme: Shopify has a plethora of themes to choose from. Pick one that aligns with your brand and customize it to fit your needs.
Let’s get started!
1. Choosing the Right Plan for Your Shopify Ecommerce Business
When it comes to Shopify ecommerce, choosing the right plan is crucial. The platform offers a range of options, each with its own set of features and pricing.
Your choice will depend on various factors, including the size of your inventory, the volume of your sales, and the specific functionalities you require.
The complete pricing plan is as follows:
| Basic Shopify
$39/month |
Shopify
$105/month |
Advanced Shopify
$399/month |
|
| Transaction Fees
*if not using Shopify Payments |
2.9% + 30¢ online
2.7% + 0¢ offline |
2.6% + 30¢ online
2.5% + 0¢ offline |
2.4% + 30¢ online
2.4% + 0¢ offline |
| Staff Accounts
*assign & manage staff’s activities |
up to 2 | up to 5 | up to 15 |
| Report Systems | Basic reports | Professional reports | Custom reports |
| Workflow Automation
*automatically manage & operate stores |
— | fully supported | fully supported |
| Inventory Locations
*more locations to track stocks & fulfill orders |
4 | 5 | 8 |
| Shipping Discount
*shipping subsidies with leading carriers |
up to 77% | up to 88% | up to 88% |
| Duties and import taxes | — | — | fully supported |
| Third-party calculated shipping rates | — | — | fully supported |
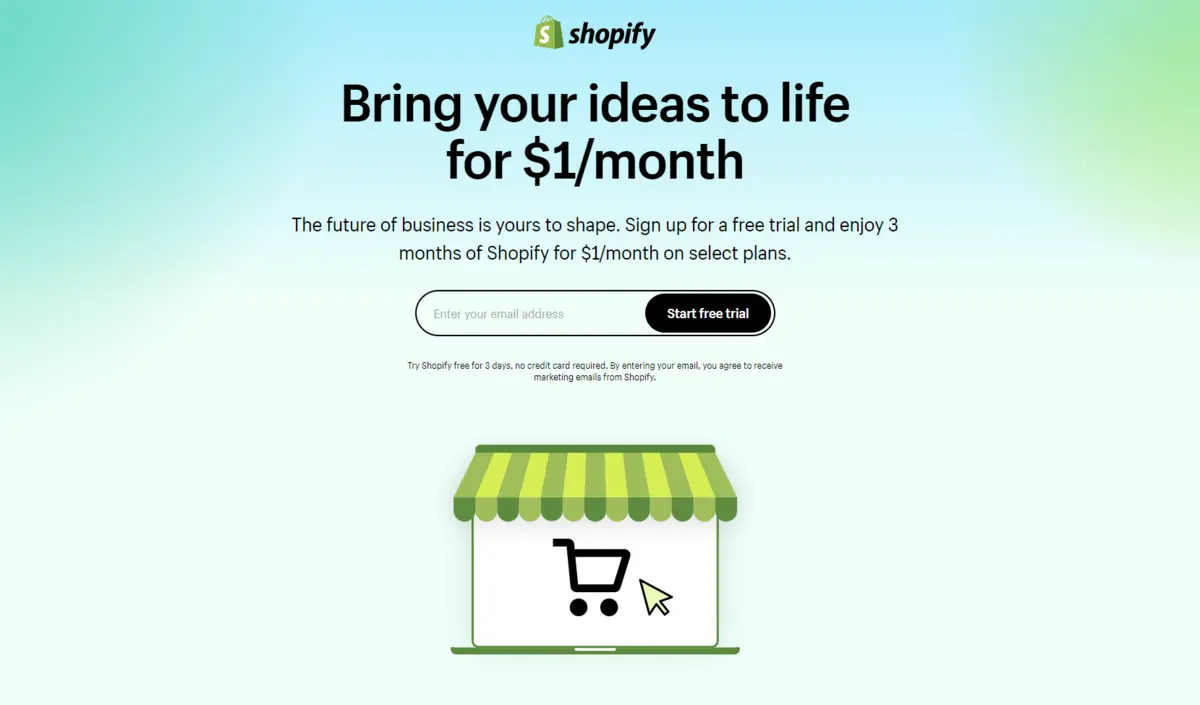
Luckily, to find the best plan for your needs, you can just start with a free trial. If the free trial period doesn’t enough for you, you can just extend the free trial period within 3 months with paying just $1 for each month.
2. Create an Account
After choosing the right plan, it’s time to create an account. Remember, it’s recommended to start with a free trial period to getting the hang of it.
It’s the best way to getting to know how does Shopify work and determine whether it’s right for you or not.
Head to the Shopify’s registration form. Like any other registration form, you will be asked several required information regarding you and the online store you are about to build.
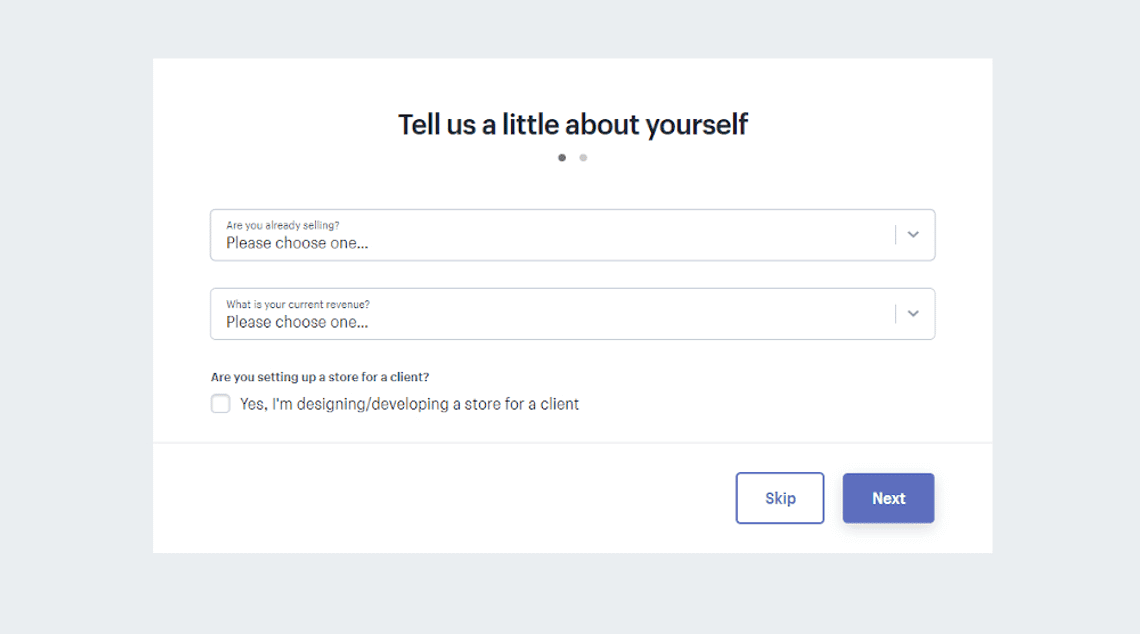
It’s easy to follow the process, especially in choosing the type of product you will sell:

You’ll be asked for the specifics of your store’s location, including its full street name and postal code.
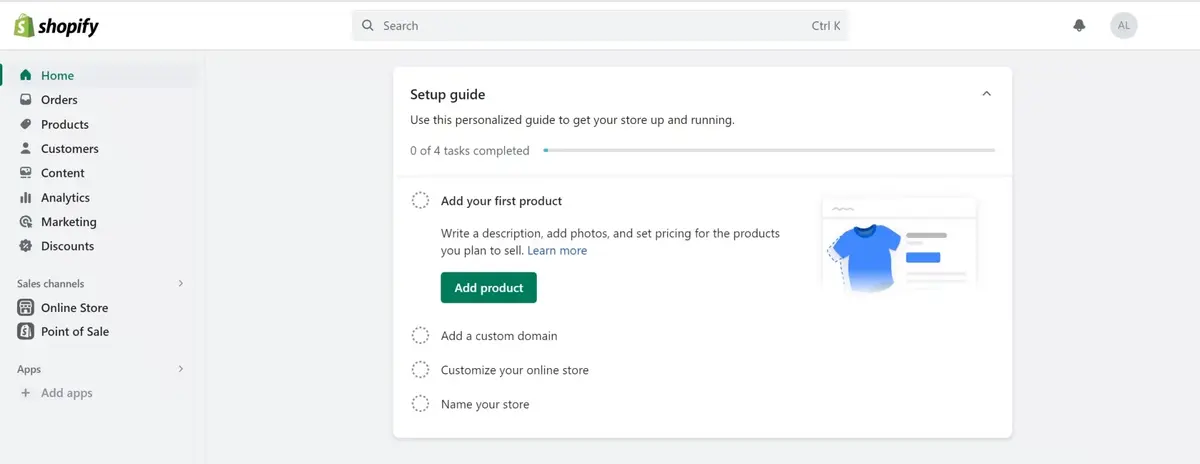
Once you’ve created your account, you’ll be directed to the Shopify dashboard. This is your control center for all things related to your Shopify online store.
Here on the dashboard, you can:
- add products
- set up payments and shipping options
- keep track of your store’s analytics
- choose a theme and customize the store
- and much more.
For those new to Shopify, the dashboard might seem overwhelming at first, but don’t worry. Our Shopify guide is designed to make using Shopify as straightforward as possible.
In the next sections, we’ll delve deeper into each of these steps, providing you with all the information you need to set up your Shopify store successfully.
Product Management on Shopify Store

After you are a bit familiar with the dashboard, now it’s time to add your first product and then learn the full product management. Managing products, including SKUs, is really easy with Shopify.
How to Use Shopify to Add and Manage Your Products
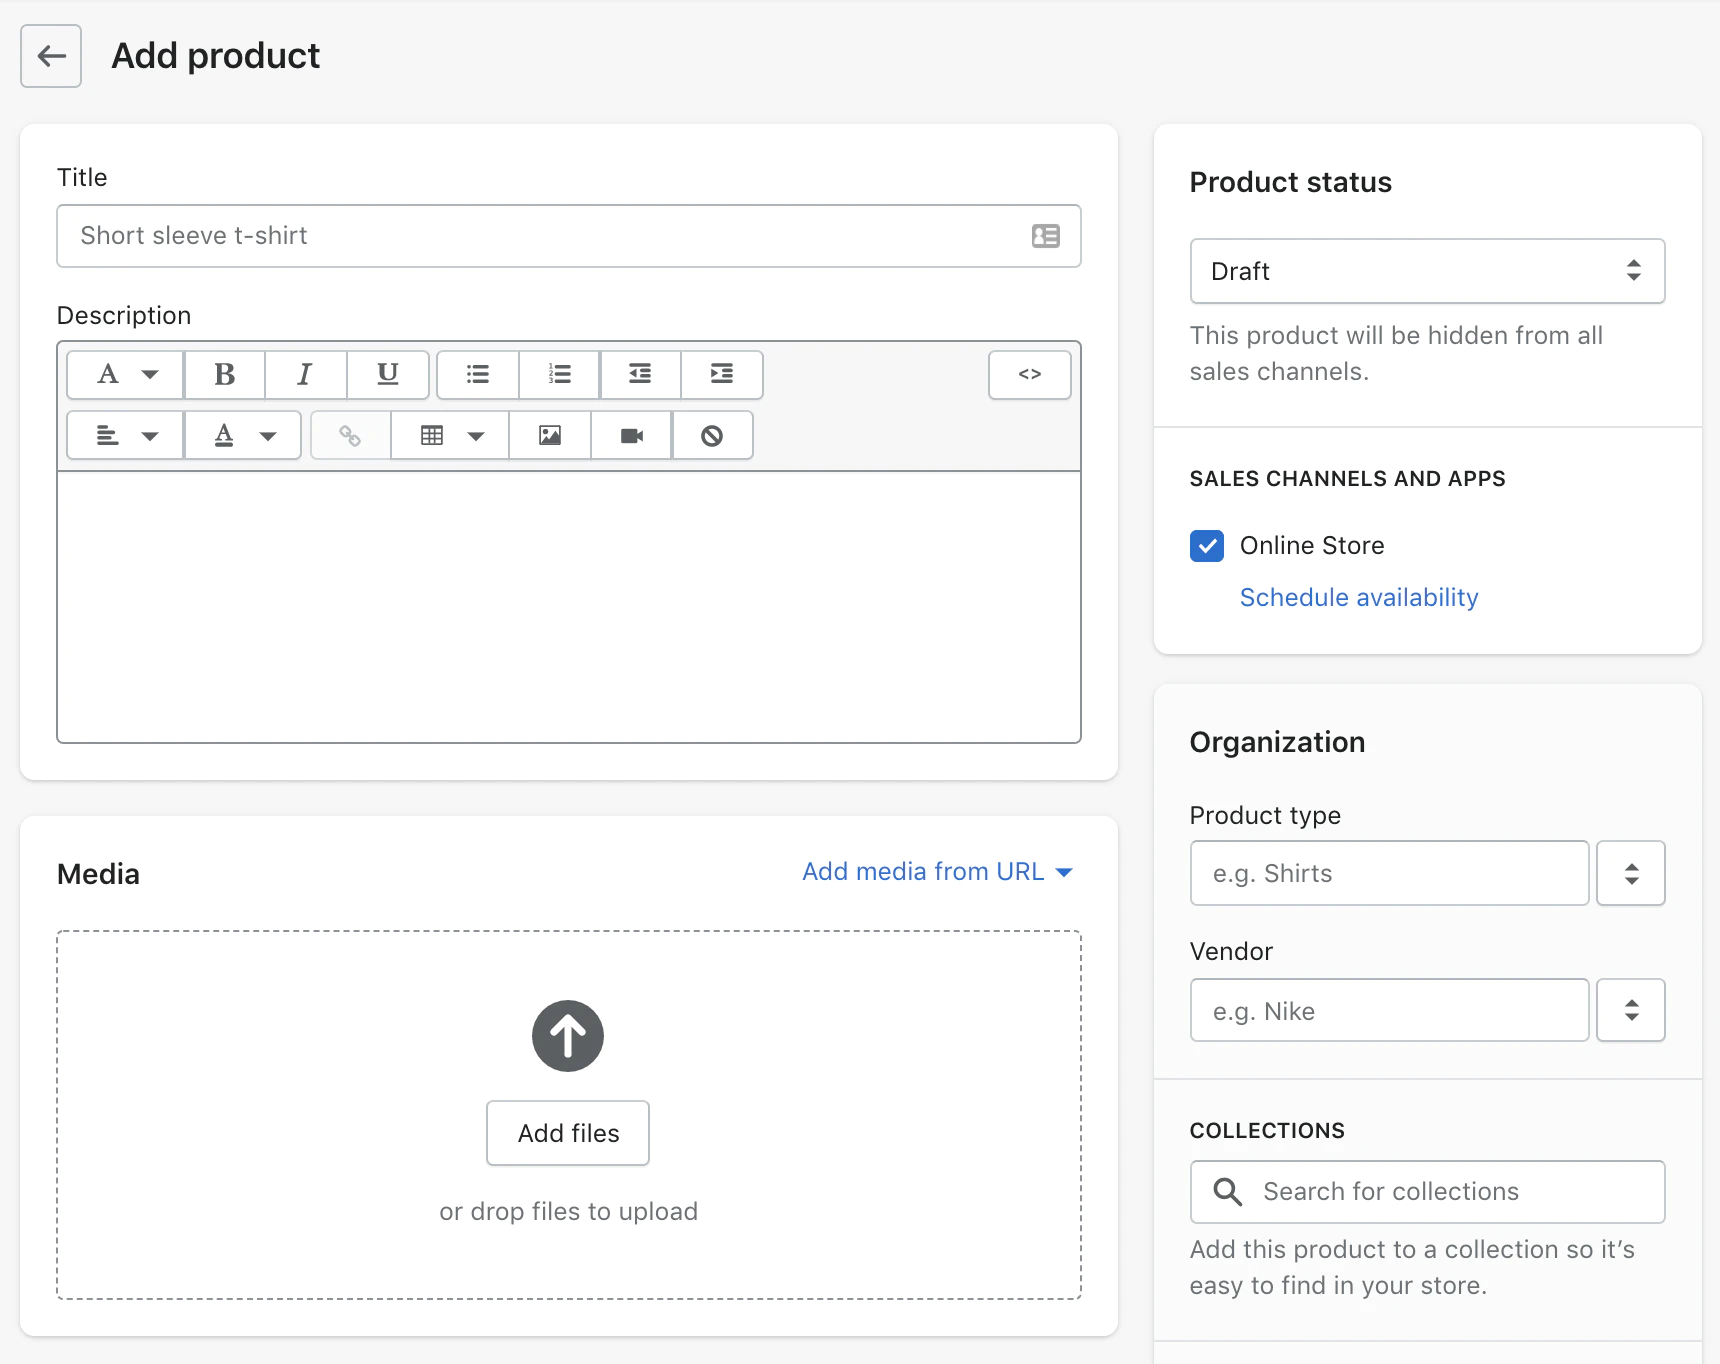
Managing your products is a critical aspect of running a successful Shopify online store. But how does Shopify work when it comes to product management?
The platform offers a comprehensive set of tools that make it easy to add, organize, and manage your inventory.
In this part of our Shopify tutorial, we’ll guide you through the steps of how to use Shopify for product management, ensuring that your store is well-stocked and organized.
Adding products to your Shopify store is a straightforward process. From the dashboard, you can easily navigate to the ‘Products’ section, where you can add new items, set prices, and manage stock levels.
You can also categorize products into collections, making it easier for customers to browse your store.
With Shopify, you can sell everything from dropshipping products to digital products. You can virtually sell anything here as long as your listings do not break Shopify’s rules.
Creating Collections: Organizing Your Shopify Online Store
Collections are a powerful feature in Shopify that allow you to group products by categories, seasons, sales, and more. Creating collections is an essential step in setting up a Shopify store that’s easy to navigate.
For instance, you could have a ‘Summer Sale’ collection featuring all products currently on discount.
Collections can be manually created or automated based on conditions you set, offering flexibility in how to setup your online store.
Organizing your products into collections not only enhances the customer experience but also improves your store’s SEO. It’s a win-win situation that you shouldn’t overlook when starting a Shopify store.
Bulk Actions: How to Manage Multiple Products at Once
If you have a large inventory, managing products one by one can be time-consuming. Shopify offers bulk actions to make your life easier.
You can select multiple products and edit them simultaneously, saving you valuable time. This feature is particularly useful during seasonal sales or when updating stock levels.
Product Variants: Offering Multiple Options
Shopify allows you to add variants to your products, such as different sizes, colors, or materials. This is crucial for providing your customers with options and enhancing their shopping experience.
Also read: Shopify vs WooCommerce
You can set different prices and stock levels for each variant, giving you granular control over your inventory.
Design and Customization

Design and customization are integral to creating a Shopify store that not only attracts visitors but also keeps them engaged.
A well-designed store is more than just visually appealing; it’s a functional space that enhances the user experience.
Before we delve into the specifics of how to make a Shopify website look stunning, let’s take a moment to understand why design and customization are so crucial.
Your store’s design is the first impression customers will have of your brand.
A clean, intuitive layout can significantly impact how long visitors stay on your site and whether they choose to make a purchase.
Customization, on the other hand, allows you to tweak the design elements to better align with your brand’s identity. Together, these aspects play a pivotal role in setting up a Shopify store that stands out.
How to Make a Shopify Website Look Stunning
Creating a visually appealing Shopify online store involves more than just selecting a beautiful theme. It’s about understanding the elements that contribute to a great design and knowing how to implement them.
In this part of our Shopify tutorial, we’ll guide you through the various customization options available, from color schemes to typography, to help you build a Shopify store that truly resonates with your brand.
Shopify offers a range of themes, both free and paid, that you can customize to fit your brand’s aesthetic. But customization doesn’t stop at themes.
You can also add custom CSS and HTML to further tailor your store’s appearance.
If you’re wondering how to create a Shopify store that’s both beautiful and functional, understanding the platform’s customization options is key.
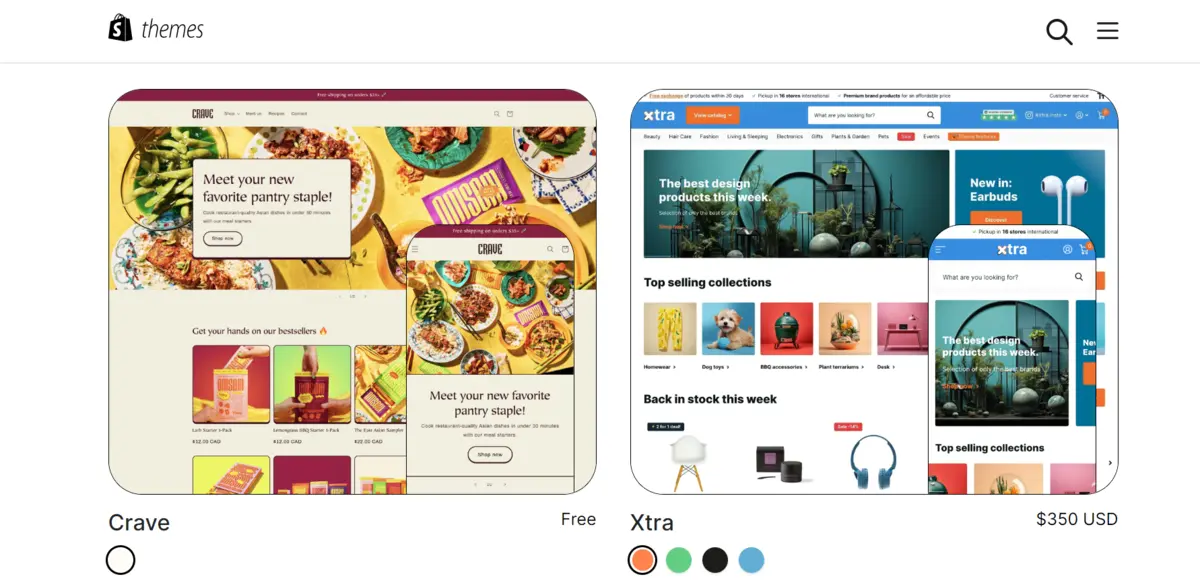
Theme Customization: Tailoring Your Shopify Store Setup
One of the first steps in setting up a Shopify store is selecting a theme. Shopify’s Theme Store offers a wide range of options, catering to various industries and design preferences.
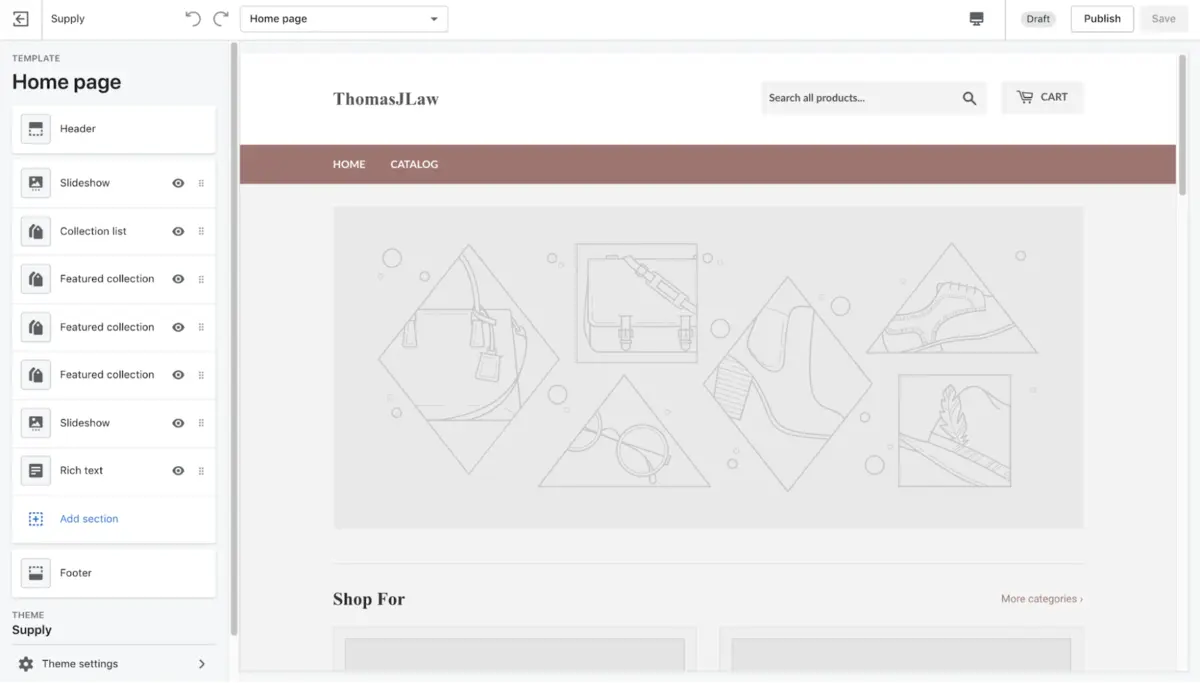
Once you’ve chosen a theme, you can customize it by adding your logo, changing colors, and rearranging layout components.
This level of customization ensures that you can create a Shopify store that aligns perfectly with your brand.
Custom Code: Taking Your Shopify Online Store to the Next Level
For those who have some coding knowledge, Shopify allows you to delve into the HTML and CSS of your store. This means you can make more advanced customizations that go beyond the standard options provided by your theme.
Whether you’re looking to add a custom banner, modify fonts, or implement advanced features, understanding how to use Shopify’s custom code options can be incredibly beneficial.

In the following sections, we’ll explore more advanced design techniques and tools that can help you take your Shopify store to the next level.
From optimizing for mobile to integrating social media, we’ve got you covered.
Stay tuned as we continue to guide you through the intricacies of setting up a Shopify store that not only looks good but also performs exceptionally well.
Setting Up Payment and Checkout Options
Navigating the payment and checkout process is a critical aspect of how to use Shopify effectively. After all, this is the stage where your customers finalize their purchases.
A smooth, secure, and user-friendly checkout experience can significantly impact your store’s conversion rates.
Before we dive into the specifics of setting up payment gateways and customizing the checkout process, let’s understand why these elements are so crucial for your Shopify business.
The payment and checkout process is the final touchpoint between you and your customers. A complicated or untrustworthy process can deter even the most interested buyers.
Therefore, understanding how to set up a Shopify store with a seamless checkout experience is vital for your business’s success.
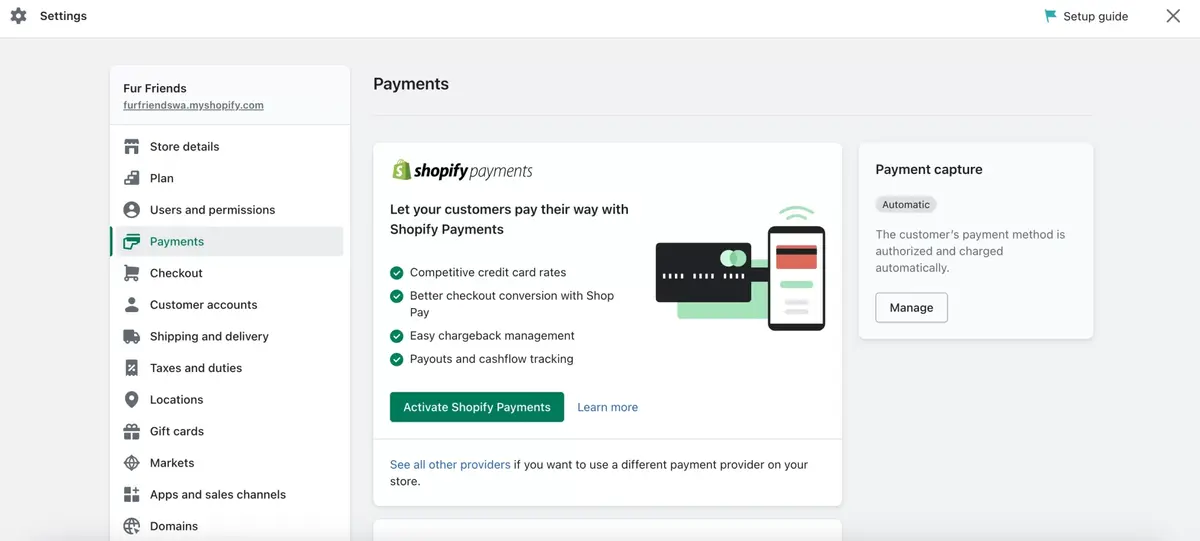
Setting Up Payment Gateways: How Does Shopify Work with Payments?
Shopify offers a variety of payment options to accommodate both you and your customers.
From Shopify Payments to third-party providers like PayPal and Stripe, you have multiple choices when it comes to accepting payments.
In this part of our Shopify guide, we’ll walk you through how to set up Shopify store payment gateways, ensuring that you can accept payments in a manner that’s both secure and convenient for your customers.
To set up a payment gateway, navigate to the ‘Payments’ section in your Shopify dashboard.
Here, you can choose from a list of supported payment providers.
Once you’ve made your selection, you’ll be guided through the setup process, which usually involves entering some business and bank details.
Customizing the Checkout Experience: Building a Shopify Store That Converts
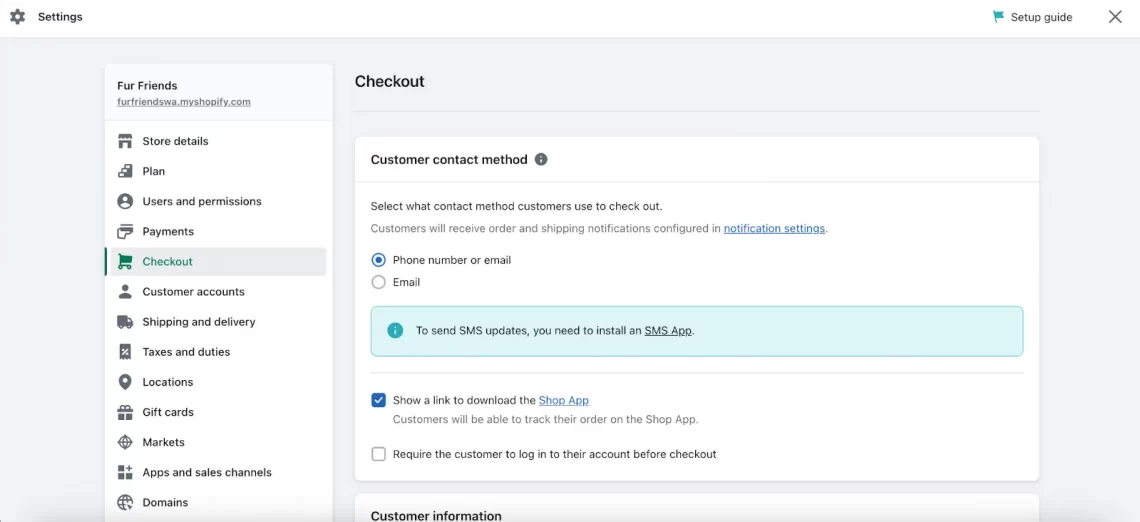
The checkout experience is more than just a transaction; it’s an opportunity to leave a lasting impression on your customers.
Shopify allows you to customize various aspects of the checkout process, from the fields that customers need to fill out to the final thank-you page.
This level of customization ensures that you can create a Shopify online store that aligns with your brand and offers a seamless shopping experience.
You can customize the checkout experience by going to the ‘Checkout’ section in your Shopify dashboard.
Here, you can edit the checkout form options, manage payment gateways, and even add custom scripts for tracking and other advanced functionalities.
Multi-Currency and Local Payments: Expanding Your Shopify Business Globally
If you’re looking to take your Shopify business global, understanding how to set up multi-currency and local payment options is essential.
Shopify allows you to accept payments in multiple currencies, automatically converting prices based on the customer’s location.
This feature not only enhances the customer experience but also broadens your market reach.
In the upcoming sections, we’ll delve deeper into advanced features and strategies to optimize your Shopify store further.
From marketing tactics to analytics, we aim to provide a comprehensive guide to using Shopify effectively. Stay tuned as we continue to explore the many facets of building and managing a successful Shopify online store.
Setting Up Shipping and Fulfillment
Shipping and fulfillment are often considered the backbone of any ecommerce business.
After all, what’s the point of having a beautifully designed Shopify online store and a range of attractive products if you can’t get them into the hands of your customers efficiently?
Before we dive into the specifics of setting up shipping and managing fulfillment in your Shopify store, let’s understand why these elements are so crucial for your Shopify business.
Shipping and fulfillment are not just logistical concerns; they’re also significant factors in your customer’s overall shopping experience.
A smooth and transparent shipping process can significantly enhance customer satisfaction, while a complicated or delayed one can do just the opposite.
Therefore, understanding how to set up shipping and fulfillment is a vital part of our Shopify guide.
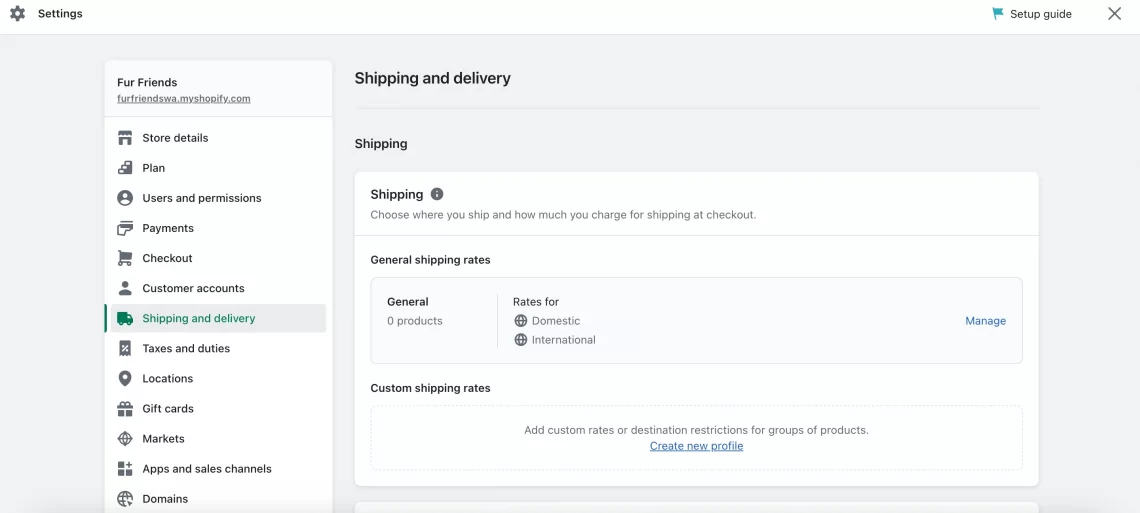
Setting Up Shipping: How to Create a Shopify Store with Efficient Logistics
Shipping settings in Shopify are highly customizable, allowing you to offer local, national, and even international shipping.
You can set flat rates, or calculate rates based on weight or value.
To set up your shipping options, go to the ‘Shipping and Delivery‘ section in your Shopify dashboard.
Here, you can add shipping zones, set shipping rates, and choose your preferred carriers.
Managing Fulfillment: How to Use Shopify for Seamless Order Processing
Once an order is placed, the next step is fulfillment. Shopify offers a range of options to make this process as smooth as possible.
You can manage fulfillment yourself, or you can integrate with third-party fulfillment services. Shopify even has its own fulfillment network for eligible businesses.
To manage your fulfillment settings, navigate to the ‘Orders’ section in your Shopify dashboard, where you can view, manage, and fulfill orders.
Dropshipping: An Alternative Approach to Shopify Store Setup
Dropshipping is a business model where you sell products that are fulfilled directly by a third-party supplier.
This means you don’t have to handle the products yourself, making it a popular choice for those new to ecommerce.
Shopify supports dropshipping through various apps available in its App Store, allowing you to add and sell products from suppliers around the world.
Also read: How to Start Dropshipping Business in 2023
In the upcoming sections, we’ll delve deeper into advanced features and strategies to optimize your Shopify store further.
From customer relationship management to analytics, we aim to provide a comprehensive guide to using Shopify effectively.
Stay tuned as we continue to explore the many facets of building and managing a successful Shopify online store.
Add a Domain: Making Your Shopify Store Official
Now that you’ve got the basics down, it’s time to make your Shopify store look more professional by adding a custom domain.
A custom domain not only adds credibility but also makes it easier for customers to find your store.
Let’s dive into how to set up a domain for your Shopify online store.
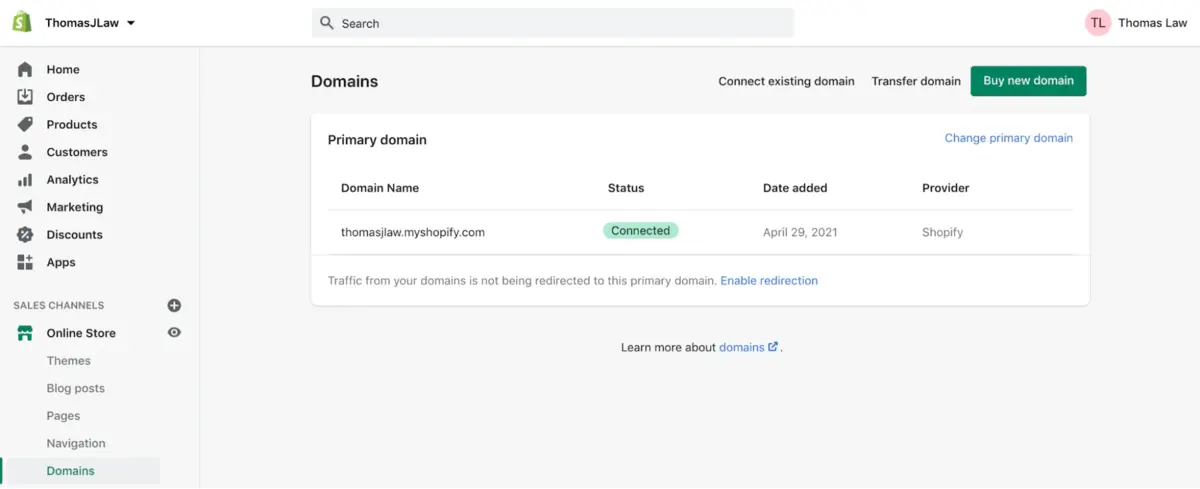
To begin, click on “Online Store” in the Shopify sidebar. Once you’re there, click on “Domains.” This will take you to a page where you’ll see three primary options at the top. Each serves a different purpose, depending on your needs.
Connect Existing Domain: Linking What You Already Own
If you already have a domain registered through a service like GoDaddy or NameCheap, you can easily connect it to your Shopify store.
Choose the “Connect existing domain” option and follow the prompts to link your existing domain to your Shopify account.
This is a great way to maintain continuity if you’re migrating from another platform or setting up a Shopify store to complement an existing website.
Transfer Domain: Bringing Everything Under One Roof
If you prefer to manage all your online assets in one place, the “Transfer domain” option is for you.
This allows you to transfer your existing domain to Shopify, making it easier to manage your store and domain from a single dashboard.
Transferring a domain is a straightforward process but make sure to follow all the steps carefully to ensure a smooth transition.
Buy a New Domain: Starting Fresh
If you’re new to the ecommerce world and don’t already have a domain, Shopify has you covered. Simply choose the “Buy a new domain” option.
You can search for available domain names right from the Shopify dashboard. Once you find one that fits your brand, click “Buy” to make it yours.
By adding a custom domain, you’re taking another significant step in setting up a Shopify store that stands out. A custom domain is more than just a web address; it’s a powerful branding tool that can help you build trust and credibility in the competitive world of online shopping.
Sales Channels and Marketing on Your Shopify Store
In the digital age, having a single point of sale is often not enough. Diversifying your sales channels can significantly boost your reach and revenue.
But how does Shopify work when it comes to integrating multiple sales channels and marketing strategies?
Before we delve into the nitty-gritty of setting up sales channels and executing effective marketing campaigns, let’s take a moment to understand their importance in the Shopify ecommerce landscape.
Sales channels are the various platforms where you can sell your products, and they can range from your Shopify online store to social media platforms and online marketplaces.
Effective marketing, on the other hand, is what drives traffic to these sales channels.
Both are crucial for starting a Shopify store that not only attracts customers but also converts them.
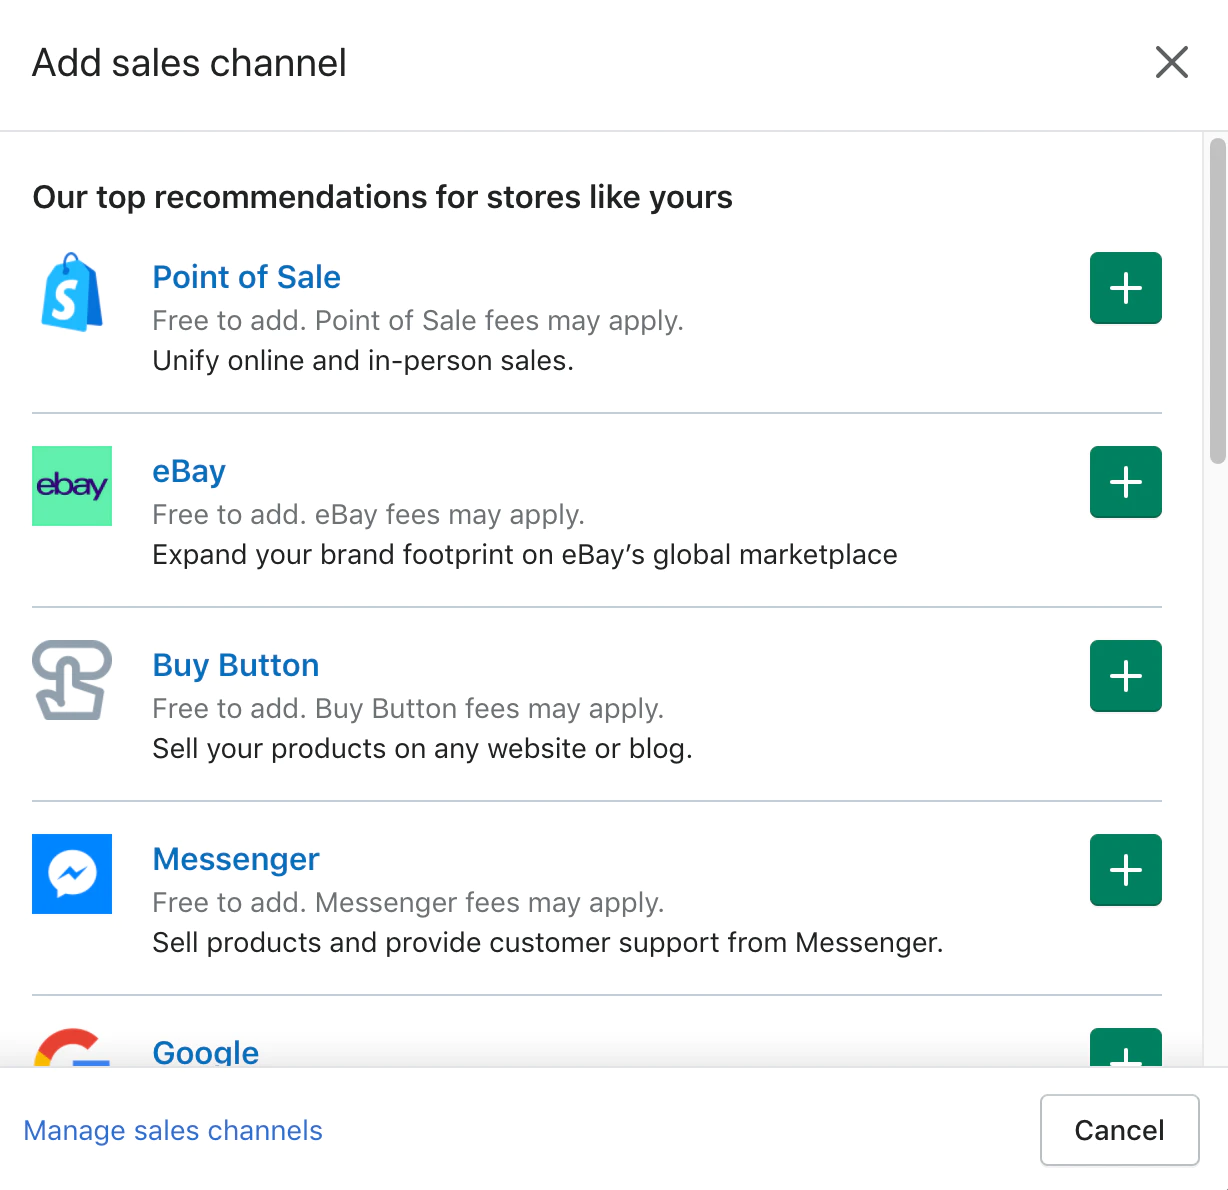
Integrating Multiple Sales Channels: How to Make a Shopify Store Ubiquitous
Shopify allows you to integrate various sales channels into your Shopify dashboard, making it easier to manage your products and orders from a single place.
Whether you’re selling on social media, through online marketplaces, or even in person, Shopify has you covered.
To add a new sales channel, go to the ‘Sales Channels‘ section in your Shopify dashboard and click on ‘Add sales channel.’
From there, you can select from a variety of options, each with its setup guide.
Digital Marketing Strategies: How to Start a Shopify Store That Sells
Once you’ve set up your sales channels, the next step is to drive traffic to them. Shopify offers a range of marketing tools and integrations to help you do just that.
From email marketing to SEO and social media advertising, our Shopify tutorial will guide you through the best practices for promoting your Shopify business.
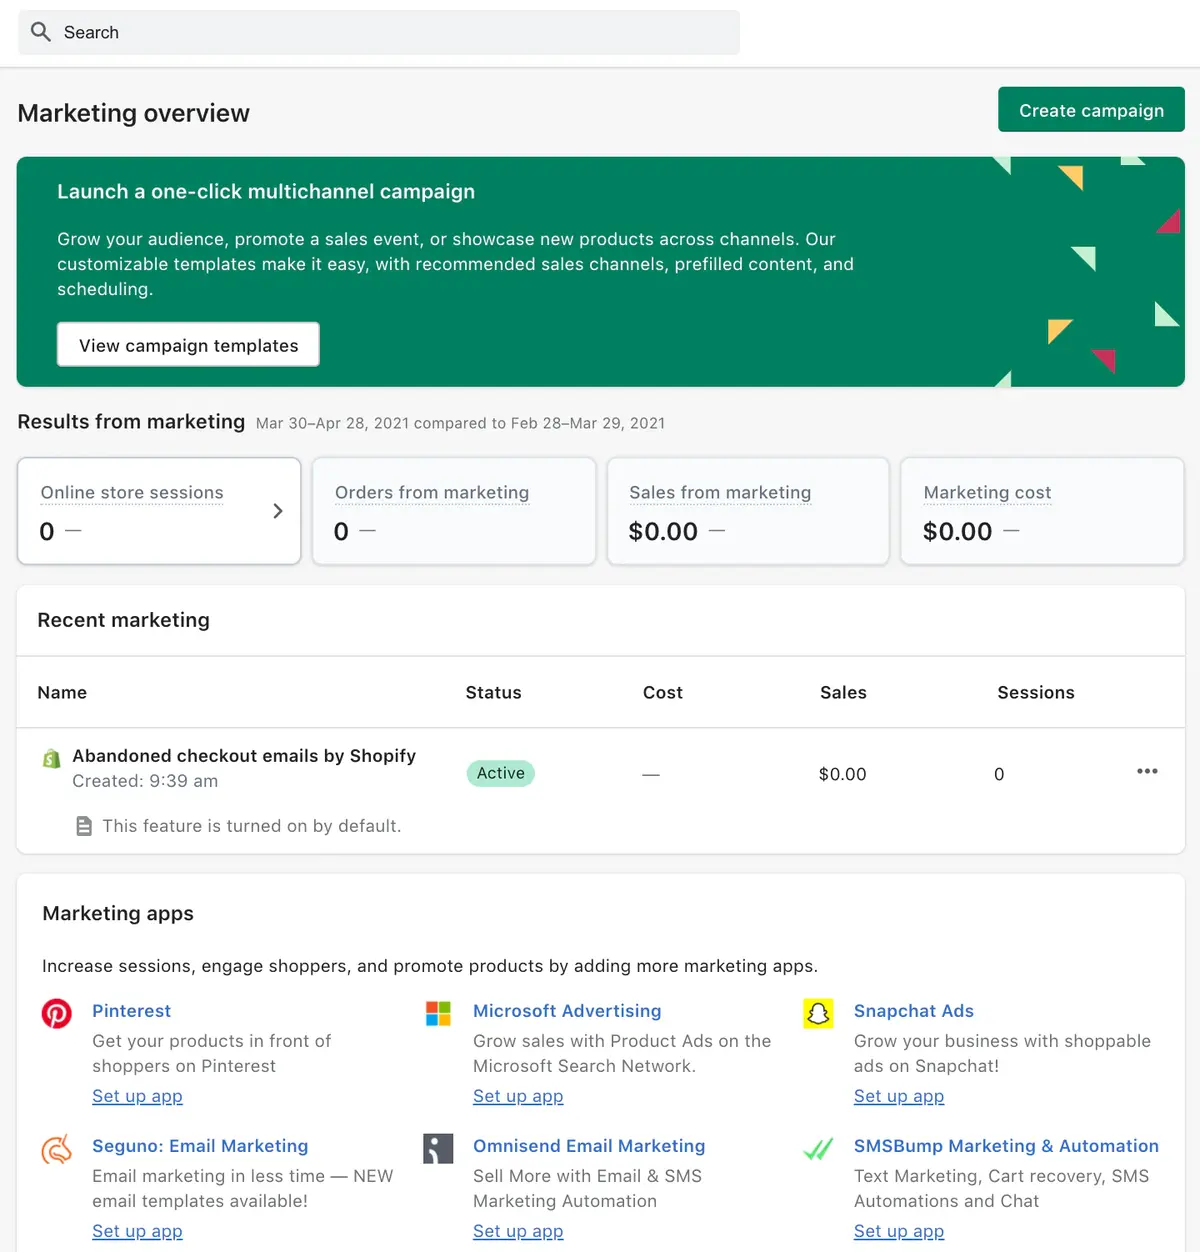
Shopify’s built-in marketing tools can be found under the ‘Marketing‘ tab in your dashboard. Here, you can create and manage campaigns, view analytics, and even set budgets.
For those new to digital marketing, Shopify also offers automated marketing recommendations to help you get started.
Social media platforms like Facebook, Instagram, and Pinterest offer excellent opportunities for showcasing your products and connecting with potential customers.
Shopify allows you to integrate these platforms directly, turning your social media pages into additional sales channels.
This is particularly useful for brands that have a strong social media following and want to leverage that audience for sales.
In the next sections, we’ll explore more advanced features and strategies, including analytics, customer relationship management, and automation.
Our aim is to provide a comprehensive Shopify guide that covers every aspect of how to use Shopify effectively.
So stay tuned as we continue to guide you through the complexities of setting up and running a successful Shopify online store.
Analytics and Reporting
In the world of ecommerce, data is king. Understanding your store’s performance, customer behavior, and sales trends can provide invaluable insights into how to grow your Shopify business.
But how does Shopify work when it comes to analytics and reporting?
Before we delve into the specifics, let’s take a moment to understand why analytics and reporting are indispensable tools for anyone looking to create a Shopify store that thrives.
Analytics and reporting are not just about numbers; they’re about deriving actionable insights that can help you make informed decisions.
Whether you’re setting up a Shopify store for the first time or looking to optimize an existing one, understanding your analytics can guide your strategies across all aspects of your business, from marketing to product selection.
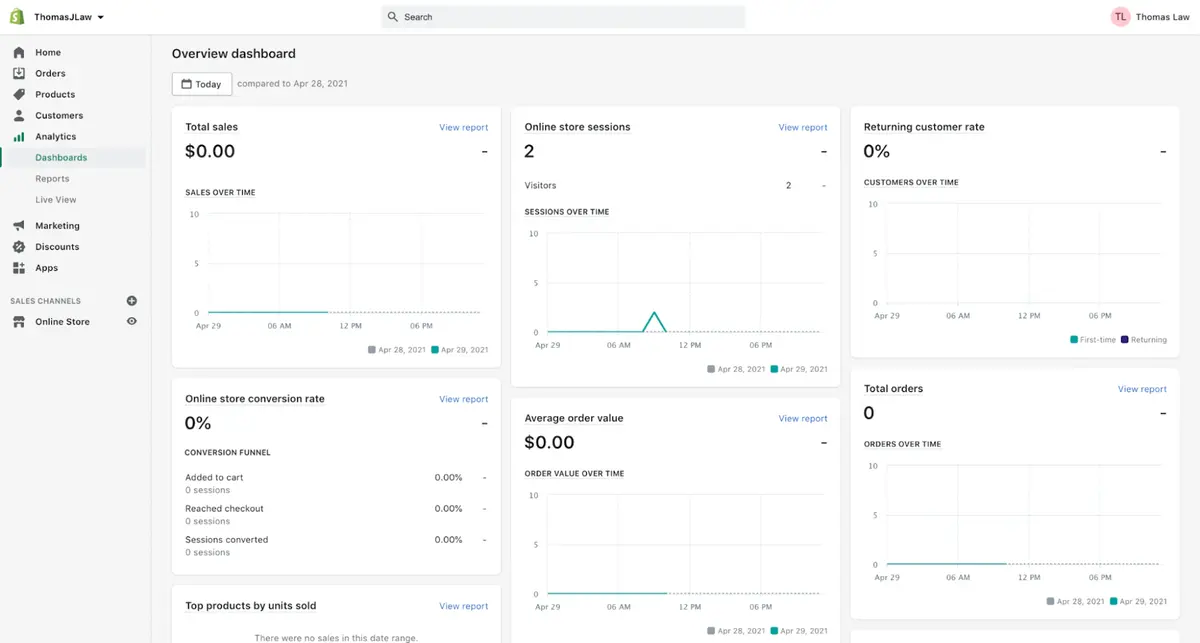
Understanding Shopify Analytics: A Guide to Making Data-Driven Decisions
Shopify offers a robust analytics platform that provides a wide range of metrics, from sales and conversion rates to customer acquisition costs.
To access these analytics, go to the ‘Analytics‘ tab in your Shopify dashboard. Here, you’ll find various reports that can be customized to show the data that’s most relevant to your business.
Sales Reports: How to Use Shopify to Track Revenue and Growth
One of the most critical aspects of analytics is understanding your sales performance. Shopify’s sales reports offer detailed insights into your revenue, order volume, and average order value.
These reports can be filtered by time period, payment method, and even by customer, giving you a comprehensive view of how your Shopify online store is performing.
Customer Behavior: How to Build a Shopify Store That Resonates
Understanding your customers is crucial for any business.
Shopify’s analytics also include reports on customer behavior, including how customers find your store, what devices they use, and which products they are interested in.
This data can be invaluable when it comes to tailoring your marketing strategies and optimizing your product listings.
Traffic and SEO: Setting Up a Shopify Store for Visibility
Traffic analytics can give you a clear picture of how well your marketing strategies are working.
Shopify provides detailed information on your store’s traffic sources, helping you understand where your customers are coming from.
This is particularly useful for assessing the effectiveness of your SEO efforts and marketing campaigns.
In the sections to come, we’ll explore more advanced features and strategies, including customer relationship management, payment solutions, and more.
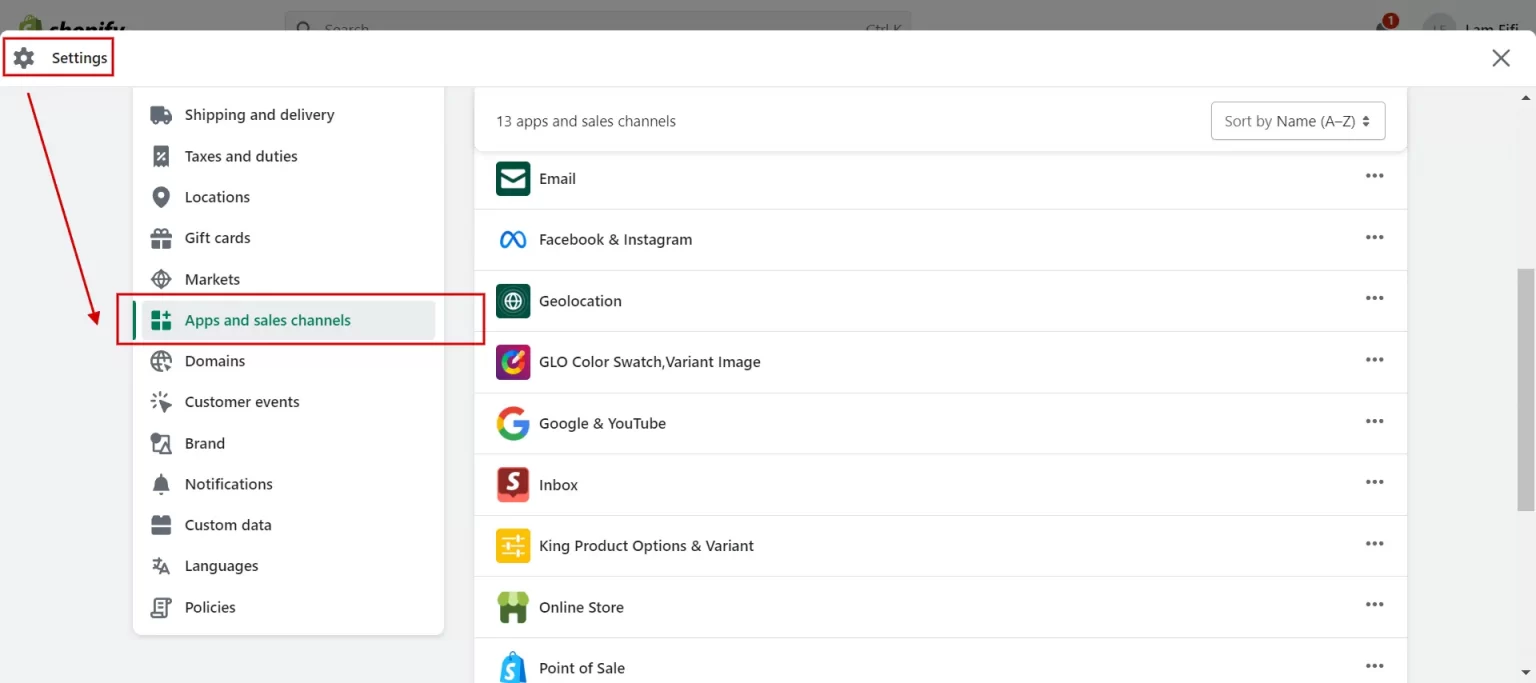
Extending Shopify: Apps and Plugins

Shopify’s core functionality is robust, but what truly sets it apart is its extensibility. With a plethora of apps and plugins, you can customize your Shopify online store to fit your specific needs.
But with so many options available, how do you choose the right ones? And how do you go about setting up these extensions in your Shopify store?
Let’s delve into these questions as we explore the world of Shopify apps and plugins.
The Shopify App Store is a treasure trove of tools designed to enhance your ecommerce experience.
From marketing automation to inventory management, there’s an app for almost every aspect of your Shopify business.
Understanding how to use these apps effectively can be a game-changer for your store.
Choosing the Right Apps: A Shopify Guide to Store Optimization
The first step in extending your Shopify capabilities is choosing the right apps.
The Shopify App Store categorizes apps by function, making it easier for you to find what you’re looking for.
Whether you’re looking to improve your store’s SEO, automate your email marketing, or add new payment methods, there’s likely an app that fits the bill.
Installing and Managing Apps: How to Set Up a Shopify Store with Enhanced Features
Installing apps on Shopify is a straightforward process. Simply go to the Shopify App Store, find the app you want to install, and click the ‘Add app‘ button.
Once installed, you can manage your apps from the ‘Apps’ section in your Shopify dashboard.
Here, you can configure settings, update apps, or uninstall them if needed.
Plugins for Customization: How to Make a Shopify Store Truly Yours
In addition to apps, Shopify also supports various plugins that allow for more advanced customizations.
These plugins can help you tweak the look and feel of your store, add new functionalities, or integrate with third-party services.
However, it’s essential to note that using plugins often requires a basic understanding of coding.
Must-Have Apps: Building a Shopify Store for Success
While the choice of apps will depend on your specific needs, some apps are almost universally beneficial.
These include SEO tools, social media integrators, and email marketing platforms.
Investing in these apps can provide a significant boost to your Shopify store’s performance and customer engagement.
Get Your Shopify Store Ready to Go Live: Final Configuration Steps
As you approach the finish line, it’s crucial to ensure that your Shopify store is fully configured and ready to go live.
This involves a few more steps, focusing on general settings, shipping rates, and tax configurations. Let’s walk through these final steps to get your Shopify online store up and running.
Pick a Shopify Plan
When you’re ready to go live, select one of three Shopify price plans:
- Basic Shopify – is $39 per month. If you’re starting a new business or just getting started, start here.
- Shopify – costs $105 per month. Choose this package if you want more advanced features suitable for a well-established firm.
- Shopify Advanced – costs $399 per month. This plan is appropriate for rapidly expanding companies with at least a few employees.
All plans have the following essential features:
- 24 hours a day, 7 days a week
- Products abound.
- Recovery of abandoned carts
- Shopify app access
- A designer of shipping labels
- Several sales channels
- SSL certificate (for security) for free
- A cashier holding 100 currencies
- Coupon codes and gift cards
- Shopify POS Lite for in-person sales
Once you’ve decided on a scheme, delete any storefront passwords to make your site public.
To do so, click “Themes” under “Online Store,” then “Disable password.”
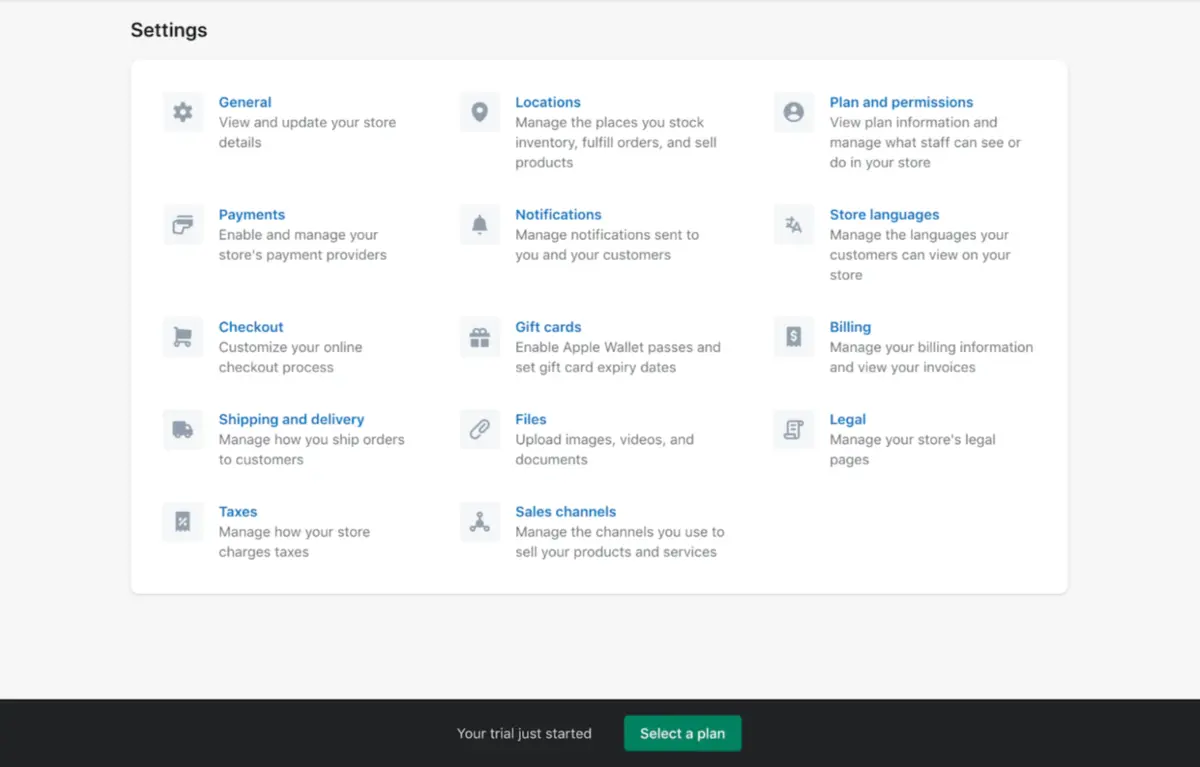
General Settings: The Foundation of Your Shopify Store
First, navigate to “Settings” located at the bottom of the Shopify sidebar. From there, click on “General.”
This section is where you’ll input all the relevant information about your business, such as the name, address, and contact details.
Filling out this section accurately is essential for a smooth business operation and also for legal compliance.
Shipping Rates: How to Set Up Shopify Store Shipping
After you’ve taken care of the general settings, head back to the “Settings” menu and click on “Shipping.” Here, you’ll set your shipping rates based on various factors like location, weight, and order value.
Shopify offers a range of options, allowing you to customize shipping rates to best suit your business model.
This is a critical step in setting up a Shopify store, as shipping can significantly impact both your margins and customer satisfaction.
Tax Settings: Keeping It Compliant
Finally, navigate to “Taxes” in the settings menu. This is where you’ll configure your tax settings based on your location and the nature of the products you’re selling.
Shopify makes it relatively easy to set up taxes, but it’s always a good idea to consult with a tax professional to ensure you’re compliant with local, state, and federal laws.
By completing these final configuration steps, you’re ensuring that your Shopify store is not just aesthetically pleasing but also functional and compliant.
These settings lay the groundwork for a successful ecommerce venture, allowing you to focus on marketing, customer engagement, and scaling your business.
How to Use Shopify to Maximize Its Full Potentials Though the Advanced Features
As your Shopify store grows, you may find yourself needing more advanced functionalities to keep up with the demands of your expanding business.
Shopify offers a range of advanced features designed to enhance your ecommerce operations, but how do you go about implementing these into your Shopify online store?
Let’s explore the advanced features that can take your Shopify business to the next level.
Shopify’s advanced features are not just bells and whistles; they are powerful tools designed to streamline your operations, improve customer experience, and ultimately, increase your sales.
These capabilities can equip you with all you need to launch a successful Shopify store or expand a current one.
Inventory Management: How to Set Up a Shopify Store for Scalability
One of the most crucial advanced features is inventory management. Shopify offers various tools to help you track your stock levels, set up automated reordering, and even integrate with third-party inventory systems.
Understanding how to use these tools effectively can be a significant advantage as you scale your Shopify business.
Multi-Language and Currency Support: How to Create a Shopify Store for a Global Audience
If you’re looking to expand your reach beyond your home country, Shopify’s multi-language and currency features are indispensable.
These features allow you to offer your products in multiple languages and accept payments in various currencies, making it easier for you to tap into international markets.
Advanced SEO and Marketing Tools: Building a Shopify Store with High Visibility
Shopify offers a range of advanced SEO and marketing tools designed to help you attract more visitors and convert them into customers.
From advanced keyword tracking to A/B testing capabilities, these features can give you an edge over your competitors.
Automation and Workflow: How to Use Shopify to Streamline Operations
Automation is another advanced feature that can save you time and effort.
Shopify allows you to set up automated workflows for common tasks such as order processing, customer segmentation, and even marketing campaigns.
By automating these processes, you can focus more on strategic aspects of your business.
Tips and Best Practices: Create Shopify Store with the Best Practices
Running a successful Shopify store involves more than just setting up your products and waiting for sales to roll in. To truly excel in the competitive world of ecommerce, you’ll need to follow some best practices.
In this section, we’ll share some valuable tips that can help you make the most of your Shopify online store, whether you’re just starting out or looking to optimize an existing setup.
Product Presentation: How to Create a Shopify Store That Sells
First impressions matter, especially in the online shopping world. High-quality images, detailed product descriptions, and intuitive navigation can make a significant difference in your conversion rates.
Make sure your Shopify store is visually appealing and user-friendly to attract and retain customers.
Customer Engagement: How to Use Shopify to Build Relationships
Engaging with your customers is crucial for long-term success. Utilize Shopify’s built-in tools for email marketing, customer segmentation, and retargeting to keep your audience engaged.
Personalized emails and special offers can go a long way in building customer loyalty.
Mobile Responsiveness: How to Make a Shopify Store That Works on All Devices
With a growing number of shoppers using mobile devices, ensuring your Shopify store is mobile-responsive is no longer optional.
Shopify themes are generally mobile-friendly, but it’s always good to test your store on various devices to ensure a smooth shopping experience.
Security Measures: Setting Up a Shopify Store You Can Trust
Trust is a significant factor in ecommerce.
Make sure your Shopify store has SSL certificates, transparent return policies, and secure payment gateways to instill confidence in your customers.
Speed Optimization: How to Build a Shopify Store That Loads Fast
Page load speed can significantly impact your SEO rankings and customer satisfaction. Use Shopify’s built-in speed optimization features and consider using a Content Delivery Network (CDN) to ensure your store loads quickly.
By following these tips and best practices, you can set your Shopify store up for success. In the next section, we’ll look at payment solutions, another critical aspect of running an ecommerce business.
Our Shopify guide aims to be a comprehensive resource for anyone looking to succeed in the world of Shopify ecommerce, so stay tuned for more valuable insights.
How to Make a Shopify Store That Succeeds: Final Thoughts
As we wrap up this comprehensive Shopify guide, it’s essential to remember that building a successful Shopify store is an ongoing process.
From the initial setup to scaling your business, each stage requires careful planning, execution, and optimization.
So, what are the final thoughts on how to make a Shopify store that not only attracts customers but also retains them?
The Importance of Strategy: How to Set Up a Shopify Store with a Plan
Having a well-thought-out business strategy is crucial.
Whether you’re just starting a Shopify store or looking to expand, a solid plan will guide your decisions and help you allocate resources more effectively.
This includes everything from product selection to marketing campaigns and customer engagement strategies.
Adapt and Evolve: How to Use Shopify to Meet Changing Demands
The ecommerce landscape is continually changing. New technologies, customer preferences, and even global events can impact your business.
Being adaptable and willing to evolve is key to long-term success. Shopify’s range of features and integrations make it easier for you to adapt to market changes quickly.
Continuous Learning: How to Build a Shopify Store and Keep Improving
One of the best ways to ensure your Shopify store’s success is through continuous learning. Stay updated with the latest ecommerce trends, Shopify updates, and customer feedback.
Use this information to make data-driven decisions and keep improving your store.
Community and Support: Using Shopify’s Ecosystem to Your Advantage
Don’t underestimate the power of community and support. Shopify has a vast ecosystem, including forums, tutorials, and third-party apps, that can help you solve problems and find new growth avenues.
Leverage these resources to build a more robust and successful Shopify business.
In conclusion, the journey to a successful Shopify store is filled with challenges and opportunities.
By following best practices, staying adaptable, and continually learning, you can build a Shopify store that not only meets but exceeds your business goals.
Thank you for following our Shopify guide, and we wish you all the best in your ecommerce endeavors.